

Navigating Uncle Sam’s tightened immigration policies has become a formidable challenge for individuals seeking entry into the United States. The implementation of stricter immigration policies has created a nerve-racking experience for first-timers applying for US visas, intensifying the stress associated with the application process.
A significant number of initially confident applicants find themselves leaving the US Embassy with rejection news, highlighting the common rejections that permeate the visa application landscape. Surprisingly, even high-profile figures, such as President Rodrigo Duterte, have not been immune to the challenges, with his own visa application facing rejection.
This underscores the inherent difficulties in obtaining a US visa, widely recognized as one of the most challenging among foreign visas. To demystify this complex process, the forthcoming article promises a comprehensive guide, meticulously delving into each step of the US visa application journey.
Aspiring applicants can also look forward to valuable tips embedded in the guide, strategically designed to increase the likelihood of approval and navigate the intricate web of immigration policies.
What is a US Visa?
The US visa requirement is a fundamental aspect for anyone desiring to visit the United States, whether for temporary purposes such as work or pleasure, or with the intention of permanent immigration. Unlike being a standalone document, the US visa is an endorsement within a passport, signifying the bearer’s authorization to enter, leave, or stay in the US for a specified period.
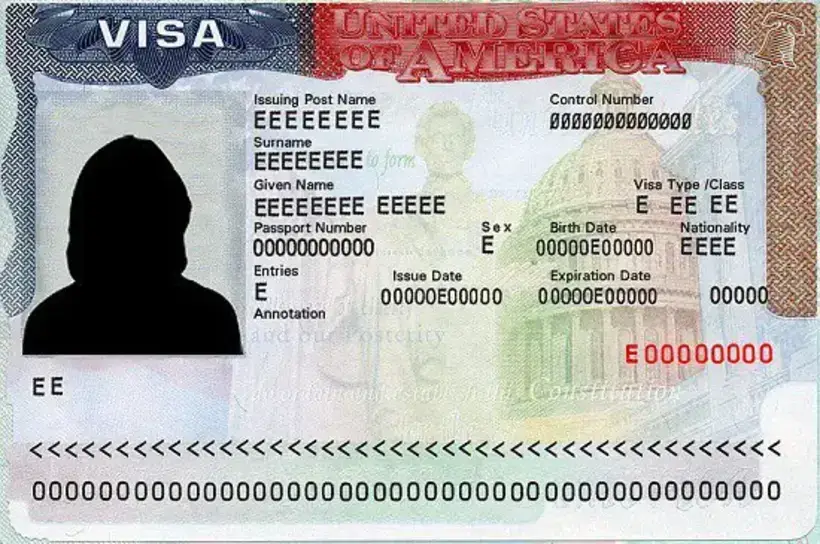
While citizens from certain countries benefit from the Visa Waiver Program, allowing them to travel to the US without a visa, the Philippines is not part of this program due to concerns about illegal immigration. Filipinos with short-term visas have, unfortunately, contributed to the issue of overstaying and seeking illegal employment, leading to the coining of the term “TNT” or “tago ng tago” (constantly hiding).
The primary purpose of the US visa is to serve as a tool for safeguarding the nation against illegal immigration, terrorism, human trafficking, and other potential threats. The US Embassy, recognizing the significance of this responsibility, adopts a highly selective approach in screening visa applicants to prevent misuse and abuse of the visa system.
Past instances of Filipinos betraying trust have contributed to this selectivity, serving as a reminder that applicants with ulterior motives are cautioned, as the US Embassy remains vigilant and prepared to deny applications if there is any suspicion of misuse or violation of visa regulations.
How Can I Apply for a US Visa in the Philippines?
1. Determine the Suitable Visa for Your Travel Intentions
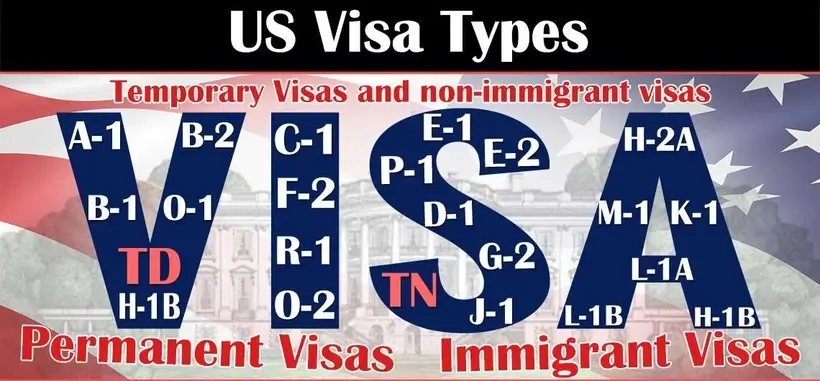
Navigating the complex landscape of US visas involves understanding the diverse array of options available. Different types of US visas cater to various purposes of travel, and a successful application hinges on aligning the chosen visa with the specific intent of the trip. Applying for a visa that accurately reflects the nature of the visit is paramount for a favorable outcome.
For example, a tourist visa would not be appropriate for someone intending to study or pursue permanent employment in the United States. The broad classification of US visas encompasses two main categories: Immigrant visas, which are designed for those seeking permanent residency, and Nonimmigrant visas, which cover temporary stays for purposes such as tourism, business, education, or employment.
Each visa category has its own set of eligibility criteria and requirements, underscoring the importance of meticulous consideration in the visa application process.
A. Immigrant Visas
Immigrant visas serve the fundamental purpose of facilitating individuals’ intention to establish permanent residence in the United States. The application process involves the submission of a petition, a responsibility that falls upon either an employer or a family member who is already a US resident or citizen.
This petition is then submitted to either the US Embassy or the US Citizenship & Immigration Service (USCIS) on behalf of the applicant.
Upon approval, the applicant is granted the immigrant visa, which bestows upon them the status of Legal Permanent Resident in the United States. Holding this visa permits the individual to reside in the US legally. Furthermore, the immigrant visa opens the door to the potential acquisition of US citizenship, presenting the opportunity for the holder to pursue a path towards full-fledged American citizenship in the future.
B. Nonimmigrant Visas
In contrast, nonimmigrant visas cater to individuals such as specialty workers, tourists, students, and business people, intending to reside in the United States temporarily.
Here is a compilation of frequently encountered nonimmigrant visas:
1. Student Visa
Student visas are an essential gateway for Filipinos seeking educational opportunities in the United States. These visas are exclusively granted to individuals who have gained approval to pursue studies in recognized U.S. educational institutions.
There are two primary types of student visas tailored to accommodate diverse educational pursuits.
- The F-1 visa is specifically crafted for individuals embarking on academic studies, enabling them to enroll in colleges, universities, or other accredited academic institutions.
- On the other hand, the M-1 visa is designed for those undertaking non-academic or vocational study and training, catering to individuals participating in programs that focus on practical skills development.
The distinction between the F-1 and M-1 visas reflects the U.S. immigration system’s commitment to accommodating the varied educational paths pursued by international students from the Philippines and around the world.
2. Work Visa
Work visas play a crucial role in facilitating temporary employment opportunities for individuals in the United States. These visas are granted based on employer or agent petitions, with each visa category corresponding to specific job roles.
- The H-1B visa is designed for individuals employed in specialty occupations, emphasizing their expertise and qualifications.
- Seasonal agricultural workers find opportunities through the H-2A visa,
- while skilled and unskilled workers benefit from the H-2B category.
- The H-3 visa is tailored for trainees,
- and H-4 is designated for dependents of visa holders.
- Intra-company transferees utilize the L-1 visa,
- with L-2 catering to their dependents.
- Exceptional individuals with outstanding abilities or achievements in diverse fields may qualify for the O visa.
- Artists and entertainers, on the other hand, secure opportunities through the P visa,
- while the Q visa is designated for participants engaged in international cultural exchange programs.
This comprehensive array of work visas reflects the diverse nature of employment opportunities and the need for a tailored approach to accommodate various job categories in the U.S. workforce.
3. Treaty Investors and Traders Visa
The Philippines and the United States maintain a robust treaty of commerce and navigation, facilitating economic cooperation between the two nations. This agreement has significant implications for Filipino citizens, who can utilize E-1 (Treaty Trader) or E-2 (Treaty Investor) visas to travel to the United States.
The E-1 visa enables individuals to engage in substantial trade, encompassing services and technology. On the other hand, the E-2 visa allows Filipinos to enter the U.S. for the purpose of investing capital, as well as overseeing the development and operations of an enterprise they have invested in.
These visas open avenues for Filipinos to actively participate in economic activities on American soil, fostering collaboration and cross-border business ventures. Overall, this treaty not only strengthens diplomatic ties but also facilitates the flow of commerce and investment between the Philippines and the United States.
4. Exchange Visitor Visa
The J visa, officially designated as a J-1 visa, is specifically designed for individuals who have been accepted and approved to participate in exchange programs in the United States. These exchange programs serve as conduits for the sharing of individuals, knowledge, and skills across various domains, including arts, sciences, and education.
The central figure in this visa category is the J-1 visa holder, often referred to as the principal visa holder, who is the primary recipient of this non-immigrant visa. Moreover, to support and enhance the experience of the J-1 visa holder, individuals accompanying them, such as spouses or children, have the option to apply for a J-2 visa.
The J-2 visa allows dependents to join the principal visa holder throughout the duration of their exchange program trip, fostering a sense of familial support and unity during the cross-cultural experience.
5. Domestic Employee Visa
A domestic employee is defined as a personal or domestic servant who accompanies or follows an employer to the United States. Filipino workers seeking employment in this capacity may be eligible for a B-1 visa, with eligibility being independent of the employer’s citizenship.
However, special cases arise when the employer is a government official or foreign diplomat. In such instances, the domestic employee may qualify for either an A-3 visa or a G-5 visa, depending on the employer’s visa status.
Examples of domestic employees encompass a diverse range of roles within the domestic service sector, such as nannies, au pairs, valets, chauffeurs, cooks, butlers, housemaids, footmen, gardeners, paid companions, and more.
It’s important to note that this list is not exhaustive, as the domestic service sector encompasses various other positions catering to the personalized needs of employers.
6. Business/Tourist Visa
The B-1 and B-2 visas serve as essential channels for foreign nationals intending to visit the United States on a temporary basis.
- The B-1 visa is specifically designed for individuals engaging in business-related activities, encompassing events like conventions, conferences, consulting endeavors, and contract negotiations.
- On the other hand, the B-2 visa, colloquially referred to as the “tourist visa,” caters to those seeking temporary residence for leisurely pursuits such as vacations, family reunions, and medical treatment.
Frequently, these visas are harmoniously combined and issued as a single entity, known as the B-1/B-2 visa, allowing travelers the flexibility to partake in both business and recreational activities during their stay in the United States.
7. Journalist and Media Visa
The Media or I visa is a specialized visa category designed specifically for Filipino reporters or local media representatives seeking temporary travel to the United States. Tailored to accommodate the unique needs of individuals in the field of media, this visa enables Filipino journalists to cover news events or engage in professional activities within the United States.
Whether reporting on significant developments, conducting interviews, or participating in media-related projects, the Media or I visa serves as a crucial facilitator, fostering international collaboration and allowing Filipino media professionals to contribute to the global discourse.
This visa category underscores the importance of media practitioners in promoting cross-cultural understanding and sharing diverse perspectives on the world stage.
8. Transit/Ship Crew Visa
The Transit or C Visa is specifically intended for individuals passing through the United States on their way to another country. It functions similarly to a tourist visa but allows for a shorter stay in the US, emphasizing the temporary nature of the visit.
On the other hand, the Crew or D Visa is designed for crew members of ships or aircraft transiting through the United States. The C-1/D Visa is a combination of both transit and crew visas, often utilized by crew members engaged in international travel.
However, if crew members wish to extend their stay in the US for vacation or during time off between flights or cruises, they are required to apply for both transit/ship crew visas (C-1/D) and the B-1/B-2 visa. This dual application ensures that they have the necessary authorization for both transit purposes and extended leisure time in the country.
9. Religious Worker Visa
The R visa, designed specifically for religious workers affiliated with recognized religious groups or organizations, provides an avenue for temporary stay in the United States. This visa category serves as a crucial tool for individuals involved in religious activities, allowing them to engage in various facets of their occupation while residing in the country.
With a primary focus on facilitating religious worship and related practices, the R visa permits qualified religious workers to fulfill their duties within the prescribed limits of their occupation. This unique visa category underscores the United States’ commitment to accommodating individuals engaged in religious service and fostering the free exercise of religion within the framework of recognized religious institutions.
2. Determine Your Eligibility for the Selected US Visa Application

Before scheduling an appointment with the US Embassy, it is crucial to thoroughly evaluate and ensure the validity of your reasons for the type of visa you are applying for. The embassy officials responsible for conducting interviews will meticulously scrutinize your application, emphasizing the importance of providing substantial evidence to support your qualifications. Failure to do so may lead to rejection.
This advisory particularly addresses popular nonimmigrant US visas, urging applicants to understand the specific criteria and prerequisites associated with their chosen visa category.
For comprehensive details regarding qualifications and requirements related to immigrant visas, applicants are advised to refer to this provided guide, facilitating a smooth and informed application process.
- Student Visa (F-1 and M-1): Aspiring students must demonstrate acceptance and approval from an accredited U.S. educational institution. Filipinos and other foreigners should be aware that studying in public elementary schools (kindergarten to 8th grade) or public adult education programs is prohibited. Detailed information can be found at Education USA.
- Treaty Traders and Investors Visa (E-1 and E-2): For those seeking opportunities in trade or investment, a complete list of qualification requirements can be found here. This comprehensive resource provides insights into the eligibility criteria for both E-1 and E-2 visas.
- Exchange Visitor Visa: To apply for an exchange visitor visa, Filipinos must first be accepted by a U.S. educational institution or program sponsor. This visa category encompasses various roles, including students, on-the-job trainees, teachers, professors, research scholars, and professional trainees in medical and allied fields.
- Business/Tourist Visa: Applicants for a business/tourist visa must demonstrate a genuine intent to visit the U.S. for a limited period. This involves proving sufficient funds and strong ties to the Philippines, such as properties, business connections, or employment.
- Domestic Employee Visa: Prospective domestic employees must establish strong ties to the Philippines and demonstrate an intention to return home after the expiration of their contract. Providing a signed employment contract and referring to a checklist for qualifications is crucial in this process.
- Religious Worker Visa: Applicants for a religious worker visa must be members of a tax-exempted nonprofit religious organization recognized by the U.S. Additionally, a minimum two-year membership in the denomination is required, and those in this category for five years must prove residence or physical presence in the Philippines for the immediate prior year.
- Transit/Ship Crew Visa: Approval for a transit/ship crew visa requires proof of intention, including funds for transit, permission to enter the destination country, and relevant travel documents.
- Work Visa: For individuals seeking employment in the U.S., the employer or agent must file a Petition for Nonimmigrant Worker (Form I-129) on behalf of the applicant. It’s important to note that having an approved petition does not guarantee visa approval. A complete list of work visas and qualifications can be found here.
- Journalist and Media Visa: Qualification for journalist and media visas involves being a representative (e.g., reporter, editor, film crew) of a local media outlet. Activities in the U.S. should be informational, such as news gathering and reporting. Freelance journalists may qualify with a contract to a media organization, a credential from a professional journalistic organization, and content not intended for commercial entertainment or advertising. Derivative I visas are available for accompanying spouses or unmarried children under 21.
3. Know the Requirements for Applying for a US Visa
For nonimmigrant US visa applicants, distinct requirements govern the application process, setting them apart from those applicable to immigrant visa seekers. It is imperative for individuals to discern the categorical differences and adhere to the specific guidelines tailored for their visa type.
Consular officers approach each application with a unique perspective, recognizing the diverse personal circumstances that applicants bring to the table.
Consequently, the documentation requested varies based on individual factors, ensuring that the visa application process remains nuanced and considers the specific needs and situations of each applicant. The type of visa being sought further shapes the requisite documentation, underscoring the importance of a comprehensive understanding of the distinct criteria associated with each visa category.
General Requirements
1. The DS-160 Form: The DS-160 Form serves as the Nonimmigrant Visa Electronic Application, providing essential information about the applicant to the US authorities. Completing this form accurately is paramount, as it directly influences the success of the visa application. Applicants are advised to answer all questions truthfully and to the best of their knowledge.
2. Passport Requirements: A valid Philippine passport is a prerequisite for a US visa application. The passport must have a validity date of at least 6 months beyond the intended stay in the United States. Ensuring the passport meets this criterion is crucial, as failure to do so may lead to delays or denial of the visa application.
3. ID Photograph Specifications: When preparing a passport-sized photo, adhere to the following guidelines to ensure compliance:
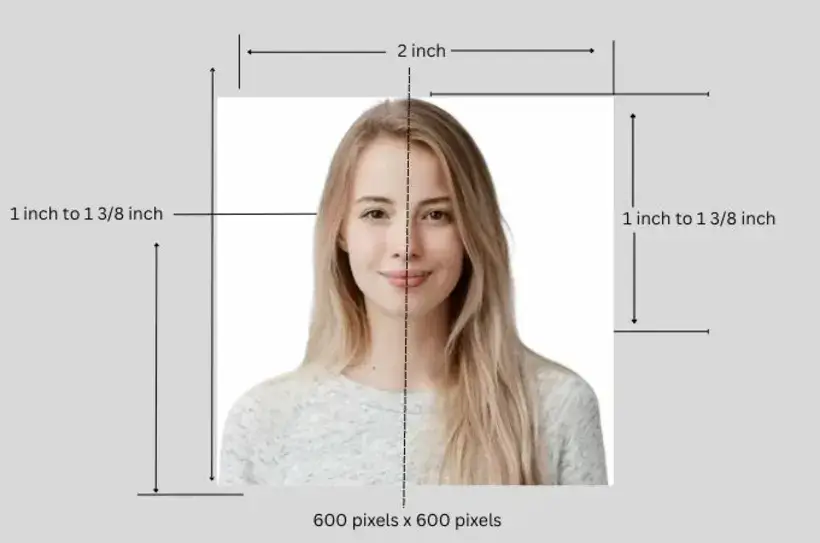
- Size: The photo dimensions should be 2″x2″.
- Recentness: Ensure the photo is taken within the last 6 months.
- Eye Position: Eyes must be open, looking straight at the camera, and positioned between 1-1/8 inches and 1-3/8 inches from the bottom of the photo.
- Head Coverage: The photo should capture your head from the top of your hair to the bottom of your chin.
- Attire: Wear normal daily clothing; uniforms and camouflage attire are not allowed except for religious attire worn daily.
- Head Position: Position your entire head at the center of the frame, measuring 1-1-3/8 inches, filling between 50% to 70% of the photo.
- Background: Ensure the background is white or off-white, uncluttered, with no shadows on the background or across your face.
- Facial Expression: Maintain a relaxed and natural facial expression.
- Color Requirement: The photo must be in color; black and white photos are not accepted.
- Hats, Head Coverings, and Eyeglasses: Remove hats and head coverings, except for religious purposes, and eyeglasses, unless medically necessary (requires a medical certificate/statement).
- Extra Copies: Bring additional copies of the photo to the interview in case requested by the consular officer. Following these specifications ensures a valid and acceptable passport-sized photo for official use.
4. Payment Receipt: A non-refundable nonimmigrant visa application fee of USD 160 (in Philippine pesos) must be paid, and applicants should retain the payment receipt as confirmation. The payment can be made through various channels specified by the US Embassy. This fee covers the processing costs associated with the visa application.
5. Interview Appointment Letter: Once the DS-160 form is completed and the visa application fee is paid, applicants must schedule an interview at the US Embassy. The confirmation of the booked appointment, usually available online, serves as the interview appointment letter. This letter outlines the date, time, and location of the scheduled interview.
Update: In an ever-evolving security landscape, the US authorities have introduced additional requirements to enhance the screening process for visa applicants. These include providing social media information for the past 5 years, details of previous and current international travel, deportation status, and checking for any involvement in terrorist activities.
Applicants should be vigilant and thorough in providing accurate and up-to-date information to avoid complications during the application process.
Supporting Documents
The purpose of submitting supporting documents for nonimmigrant US visa applicants is to establish a compelling case that underscores a robust intention to return to the Philippines following their trip.
While not all applicants are universally required to provide supporting documents, as the application form and interview process may furnish sufficient information, it is crucial to recognize that such documents might be requested on a case-by-case basis, especially if any red flags emerge during the application review. This request is designed to enhance the applicant’s profile and ensure the legitimacy of their travel plans.
In light of this, it is advisable for applicants to be thoroughly prepared when visiting the US Embassy, anticipating potential document requests.
The two primary categories of supporting documents, namely proof of funds and proof of strong ties, serve as critical indicators of an applicant’s financial capability for the trip and their commitment to returning to the Philippines, respectively, mitigating any concerns about potential illegal overstays in the US.
Proof of Funds
1. For Employed Individuals
- Recent Payslips (Last 3 Months): Applicants should provide the latest payslips from the past three months, showcasing their regular income and employment status.
- Certificate of Employment (COE): A detailed COE, specifying the applicant’s position, salary, and tenure, serves as an official confirmation of their employment status.
- Income Tax Return (ITR) for the Previous Year: Submission of the previous year’s ITR adds credibility to the application, offering a comprehensive overview of the applicant’s financial history.
2. For Self-Employed Individuals
- Tax Statements or Tax-Paying Certificate: Self-employed individuals must provide their tax statements or a tax-paying certificate to demonstrate compliance with tax regulations.
- Business Permit or Official Business Registration Copy: A copy of the business permit or official registration serves as proof of the legitimacy of the applicant’s business.
- Bank Certificates, Bank Statements, or Company Financial Reports (Last 3 Months): Financial documents, such as bank certificates and statements, or recent company financial reports, establish the financial stability of the self-employed individual.
3. For Students or Minors
- Sponsorship Letter from Parents/Legal Guardians: Students or minors should submit a sponsorship letter from their parents or legal guardians, along with proof of solvency.
- Certification from the School or Educational Institution: For US student visa applications, a certification from the educational institution specifying scholarship details is crucial.
4. For Retirees
- Evidence of Pension (e.g., Receipts): Retirees should provide evidence of their pension, such as pension receipts, to support their financial standing.
- Retirement Certification: A retirement certification serves as official documentation of the retiree’s status.
- Financial Assets and Proof of Investments: Providing details of financial assets and investments adds weight to the retiree’s financial stability.
- Business Permits and Other Self-Employment Requirements (If Applicable): Retirees engaged in self-employment should include relevant business permits and documentation.
5. For Unemployed Individuals
- Copies of Bank Statements, Bank Certificates, and Personal Credit Cards (Last 3 Months): Unemployed applicants should submit recent bank statements, certificates, and personal credit card details to demonstrate financial viability.
- Financial Assets and Proof of Investments: Highlighting financial assets and investments can bolster the application.
- Sponsorship Letter with Proof of Sponsor’s Solvency: A sponsorship letter, along with proof of the sponsor’s solvency, can support the application for unemployed individuals.
6. Additional Proof of Funds
- Consider Adding a Sponsor: Even if self-sufficient, adding a sponsor can strengthen the application.
- Proof of Accommodation: Include hotel reservations with free cancellation as proof of accommodation during the stay in the US.
- Show Return Tickets: Demonstrate a scheduled return to the home country by providing return tickets, assuring the authorities of the applicant’s intention to abide by the visa terms.
Proof of Evidence of Strong Ties to the Country
Proof of strong ties is a crucial element in demonstrating compelling reasons for individuals to return to the Philippines following a trip to the United States. This requirement serves as a preventative measure against illegal immigration, a concern addressed by the US Embassy.
The variable requirements for establishing strong ties vary depending on the applicant’s financial resources, travel plans or history, and personal circumstances.
By assessing these factors, immigration authorities can better determine the likelihood of an individual returning to their home country, contributing to the effectiveness of immigration policies and maintaining the integrity of the entry and exit process between the Philippines and the United States.
1. For the Employed
- Leave of Absence: When seeking permission for international travel, a formal leave of absence from your employer is paramount. This document confirms that your absence has been approved and is essential for maintaining a good employer-employee relationship.
- Certificate of Employment: A Certificate of Employment provides additional verification of your current employment status, job role, and duration of service. This document is crucial for demonstrating your ties to your home country.
- Letter of Explanation: A well-drafted letter from you, explaining the purpose of your visit, the expected duration of your stay, and the reasons why you won’t overstay, serves as a personal touch to your application. This can be a decisive factor in the approval process.
2. For the Self-Employed
- Business Registration: Proof of your business’s legal existence, such as a business registration certificate, is vital. It establishes your role as a self-employed individual and provides assurance regarding the legitimacy of your business.
- Scheduled Business Meetings or Company Events: If applicable, providing an itinerary of scheduled business meetings or company events during your stay strengthens your case. It demonstrates a commitment to professional responsibilities in your home country.
- Property Ownership Documents: Presenting land titles and other proofs of property or real estate ownership adds an extra layer of assurance regarding your ties to your home country.
- Letter of Explanation: Similar to employed individuals, a well-articulated letter detailing the purpose of your visit, your commitment to returning, and the reasons for your trip can enhance your application.
3. For Students or Minors
- Leave of Absence: For students, obtaining formal approval for a leave of absence from your educational institution is crucial. This demonstrates responsible academic behavior.
- School Enrollment Certificate: A certificate confirming your current enrollment status provides additional evidence of your commitment to your studies.
- Letter from You and Your Parents/Legal Guardians: A joint letter explaining the purpose of the trip, assurance of your return, and the reasons for not overstaying provides a comprehensive view of your intentions.
4. For Retirees
- Property Ownership Documents: Retirees are often required to provide evidence of property or real estate ownership, reinforcing their connections to their home country.
- Letter of Explanation: A letter explaining the reasons for your travel, your plans during your stay, and the assurance of your return is crucial for retirees.
5. For the Unemployed
- Property Ownership Documents: Similar to other categories, proof of property ownership establishes strong ties to your home country.
- Contract/Job Offer (if applicable): If planning to secure employment in the Philippines, providing a valid job offer or contract adds credibility to your application.
- Comprehensive Letter of Explanation: For unemployed individuals, a detailed letter explaining your plans, supported by authentic documents (e.g., business plans, school enrollment), is essential for a successful application.
Ensuring the authenticity of all submitted documents is imperative in the visa application process. Submission of falsified or counterfeit documents will result in permanent visa ineligibility. To address concerns about confidentiality, it is recommended to use sealed envelopes for document submission.
Applicants are encouraged to bring as many supporting documents as possible to demonstrate their preparedness for the visa application. The specific supporting documents required may vary depending on the visa type, so applicants should take the time to familiarize themselves with the specific requirements and be well-prepared accordingly.
This commitment to accuracy and thorough preparation not only enhances the credibility of the application but also facilitates a smoother and more efficient visa processing experience.
Additional Documents Required (Based on the Type of US Visa)
List of US Visas and Additional Document Requirements:
- Business/Tourist Visa
- Work Visa
- Student Visa
- Exchange Visitor Visa
- Transit/Ship Crew Visa
- Religious Worker Visa
- Domestic Employee Visa
- Journalist and Media Visa
Note: Depending on the type of US visa, additional documents may be required beyond the general ones mentioned. Check the specific requirements for each visa type using the provided links.
4. Complete the US Visa Online Application Form

The Requirement for All Nonimmigrant US Visa Applicants mandates that individuals of all ages must diligently complete and submit the Nonimmigrant Visa Electronic Application (DS-160) form. The DS-160 form serves as a pivotal document for two crucial reasons.
Firstly, it is a prerequisite for scheduling an appointment with the US Embassy, generating an alphanumeric barcode number essential for the process.
Secondly, the completion of the DS-160 form is indispensable for the visa interview; access to the embassy premises is strictly contingent upon presenting the printed DS-160 confirmation page.
Underscoring the paramount importance of the DS-160 form, the requirement stresses that any omission or inaccuracy in the provided information may result in visa rejection. Furthermore, the submission of handwritten or typed applications is strictly prohibited, underscoring the exclusivity of the electronically submitted DS-160 form.
To facilitate the process, applicants are encouraged to enlist the assistance of translators or immigration lawyers if needed. The Requirement also provides clear guidance on the procedural steps for completing the DS-160 form, emphasizing the need for meticulous adherence to the specified instructions.
Gather the Necessary Information and Documents for Filling Out the DS-160 Form
- Passport: Make sure your passport is valid for the duration of your intended stay.
- ID Picture: Submit a soft copy of your ID picture according to the instructions outlined in step 3.
- Résumé or Curriculum Vitae: Include comprehensive details about your education and employment history in your résumé or curriculum vitae.
- International Travel History: Provide specific details on the dates of your last five trips to the United States, if applicable.
- Travel Itinerary: If travel arrangements have been made, submit your detailed travel itinerary for reference.
- Additional Information for US Visa: For students and exchange visitors, include specific details such as school address and SEVIS ID. Obtain your SEVIS ID from your I-20 or DS-2019 form.
Access and Fill Out the DS-160 Form Online
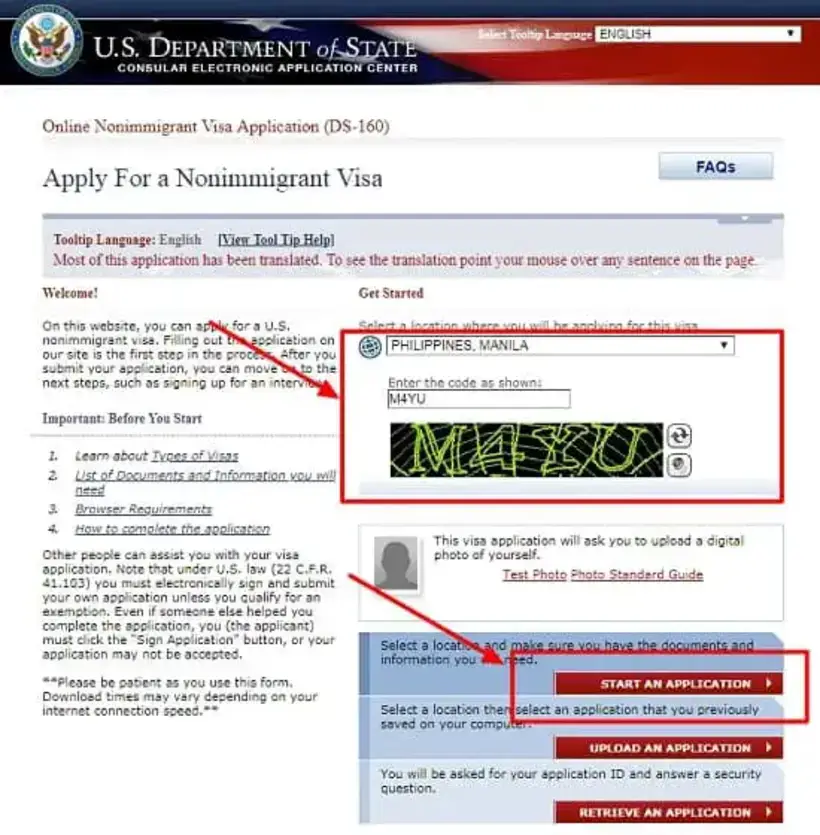
To commence the DS-160 form application process, visit the Consular Electronic Application Center website. If you experience challenges accessing the page, ensure you are using either Firefox or Internet Explorer as your browser. Upon reaching the website, specify your location, for instance, Philippines, Manila.
Subsequently, enter the captcha code provided for security verification. To initiate the DS-160 form application, click on the “Start An Application” button. This step marks the beginning of the application process, allowing you to provide the necessary information for your intended purpose.
Fill Out and Complete the DS-160 Form With All the Required Information
The DS-160 form for visa applications encompasses a wide array of information across various categories, ensuring a thorough assessment of the applicant’s background. The form is structured into the following key sections:
- Personal Information
- Name
- Gender
- Marital status
- Address
- Contact information
- Passport information, etc.
- Travel Information
- Purpose of the trip
- Travel companions
- Previous trips to the US, etc.
- Family Information
- Details about parents
- Details about spouse, etc.
- Work and Education History
- Employment history
- Educational background, etc.
- Security and Background
- Any mental/physical disorders or communicable diseases
- Criminal background, etc.
Completing the DS-160 form demands meticulous attention to detail, as applicants can anticipate a comprehensive set of questions within these categories.
To get a glimpse of the questions that will be presented in the application form, click here.
Upload an Identification Photo
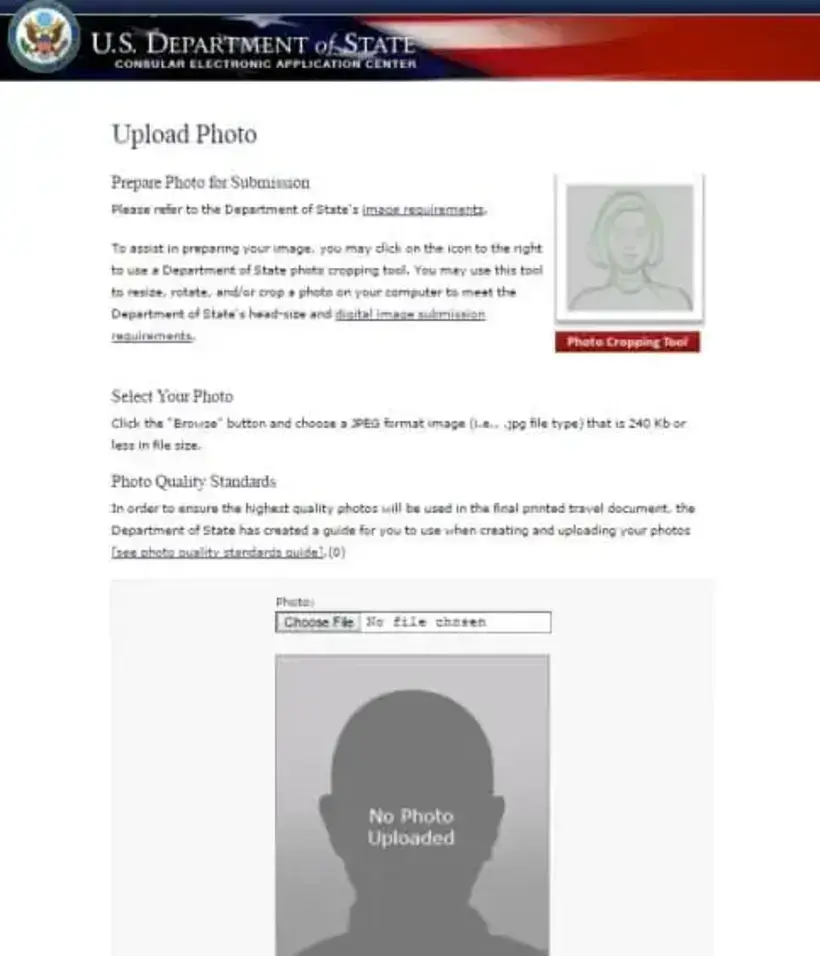
Verify that the photo adheres to the specified dimensions and meets the requirements outlined by the US Embassy. Refer to step 3 of this guide for additional details.
Review Your Application Prior to Submission
Before finalizing the submission of your DS-160 form, it is imperative to meticulously review all the provided information to ensure its accuracy and completeness.
Once the form is submitted, changes cannot be made, underscoring the importance of thorough verification. If you are confident that all details are accurate, consider entering your passport number and the captcha code as a secure E-Signature.
This step not only confirms the authenticity of the information but also streamlines the submission process. To complete the process, click on “Sign and Submit Application,” marking the conclusion of the application procedure.
Print a Copy of Your DS-160 Confirmation Page

It is imperative to bring the printed confirmation form to the US Embassy on the day of your scheduled interview. The alphanumeric barcode featured on the confirmation page is of utmost importance, serving as a key element for the consular officer to access your DS-160.
Entry into the US Embassy premises will not be granted without the confirmation page, and failure to present it may result in an automatic forfeiture of your application.
To avoid any unforeseen complications, it is strongly recommended to maintain a backup copy of your DS-160 form. Achieve this by simply hitting the “Back” button on your browser and taking the precautionary step of emailing yourself a PDF version of the form for safekeeping.
Additional Tips for DS-160 Form Completion
- Save Early, Save Often: While completing the DS-160 form, make it a habit to click on the “Save” button regularly to prevent any loss of data in case of unexpected issues. The system is designed to automatically save each completed page as you progress through the form.
- Guard Against Timeouts: Be mindful of the 20-minute inactivity timeout feature. If you leave the form unattended for more than 20 minutes, the page may time out, and your progress could be lost. Always click on “Save” before taking breaks or navigating away from the page to avoid any potential data loss.
- Automated Page Saving: Rest assured that each completed page is automatically saved by the system. This feature provides an additional layer of security for your data throughout the application process.
- Save Partially Completed Applications: If you’re unable to finish the DS-160 form in one sitting, you can save a partially completed application and return to it later. To do this, click on the “Save Application” button, which allows you to download an incomplete application and store it on your personal computer.
- Resuming an Incomplete Application: To resume a partially completed application, visit the Consular Electronic Application Center website. Click on “Retrieve an Application” and enter the application ID and security question associated with the saved form.
- Downloading Incomplete Applications: If you have saved an incomplete application, you can download it to your personal computer for future access. This ensures that you have a backup copy of your progress and can easily resume the application process at your convenience.
- Returning Within 30 Days: It’s important to note that saved applications are accessible for a period of 30 days. If you need to return to a saved application after the initial session, select “Upload an Application” within the specified timeframe and follow the provided instructions to resume where you left off.
5. Submit Payment for the US Visa Application Fee
To schedule a US Embassy interview, applicants are required to pay a non-refundable Machine Readable Visa (MRV) application fee. This fee is crucial for confirming online appointments and varies depending on the type of visa sought, alongside the current USD to peso exchange rate.
For detailed information on the various US visa types and their corresponding application fees, individuals are encouraged to refer to this specific page dedicated to this purpose.
As a guideline, tourist visas incur a fee of $160, petition-based visas for religious or work purposes amount to $190, K visas require a payment of $265, and E visas command a fee of $205. Payment options are flexible, allowing applicants to choose between over-the-counter transactions and convenient online payments to facilitate a smooth and efficient process.
1. Online Payment Option
Payment for the US Visa MRV (Machine-Readable Visa) fee can be a hassle-free experience through the utilization of BPI or Bancnet online bill payment services. These platforms offer a swift and convenient method for applicants, eliminating the need to physically visit a bank.
With an account on either BPI or Bancnet, individuals can seamlessly make payments, saving both time and effort in the visa application process.
To initiate the payment process, applicants can visit the official websites of BPI or Bancnet. Once on the platform, they need to provide the specific reference number associated with their chosen service.
- BPI customers should use reference number 48160628,
- while Bancnet customers should input reference number 35887923.
This straightforward procedure streamlines the payment process and ensures accurate transaction processing.
For a more detailed and user-friendly experience, applicants can refer to the comprehensive guides available online.
These guides, titled
- “How to Pay US Visa Application Fee Online with BPI“
- and “How to Pay US Visa Application Fee Online with Bancnet,”
provide step-by-step instructions to assist applicants throughout the payment process. Following these guides can help individuals navigate potential complexities and make the payment with ease.
To enhance the organization and tracking of payments, it is recommended that family or group applicants avoid lump-sum payments. Making individual payments for each applicant generates unique receipt numbers, simplifying the confirmation and appointment process.
Once the payment is accepted, applicants will receive an email confirmation. It is essential to print and bring this confirmation to the US Embassy on the scheduled appointment day, ensuring a smooth and efficient visa application experience.
2. Over-the-Counter Payment Option
To facilitate the payment of your US visa application fee, opt for the convenient cash payment method at any BPI branch.
Begin by acquiring a printed copy of your unique deposit slip from the designated page, ensuring that it corresponds to the specific cost of your visa application fee. Remember that each deposit slip is tailored to a particular application fee and must be utilized for a single transaction before its expiration date.
Should the deposit slip expire, generate a new one by revisiting the provided page and re-clicking the link.
Following the successful payment, retain the receipt as the receipt number will be indispensable for scheduling your visa appointment. This meticulous process ensures a smooth and organized handling of your US visa application payment.
6. Schedule a Visa Interview Appointment at the US Embassy

To initiate the visa application process, applicants are required to pay the visa application fee. It is important to note that appointment scheduling is not immediate and is subject to specific timelines based on the chosen payment mode.
For over-the-counter bank transactions, applicants can schedule their appointments after a minimum waiting period of four hours following the payment. On the other hand, for online payments, the processing time varies and is influenced by factors such as the time of payment and the usage of BPI/Bancnet services.
This dynamic processing time ensures that applicants are informed and can plan their next steps accordingly, taking into account the chosen payment method.
The following tables provide a summary of their processing times and specify the exact timeframe within which you can schedule an appointment:
Online payments conducted through BPI:

Online payments processed through Bancnet:

Once the waiting period has elapsed, you are eligible to arrange an appointment. There are two available methods to secure an appointment with the US Embassy: either online through the US Department of State’s Bureau of Consular Affairs website or by contacting a customer service representative over the phone for assistance.
1. Online Option
Before embarking on this journey, make sure you have the following essential information at your fingertips:
- MRV Fee Payment Receipt Number: This is a unique identification number associated with your visa application fee payment. It is crucial for the appointment scheduling process.
- Passport Number: Your passport is a key document throughout the visa application process. Ensure you have the passport number readily available.
- DS-160 Confirmation Page: Retrieve the ten-digit barcode number from your DS-160 confirmation page. This code is essential for the online appointment scheduling system.
Now, let’s walk through the steps to schedule your US visa appointment:
Step 1: Visit the US Department of State’s Bureau of Consular Affairs Website
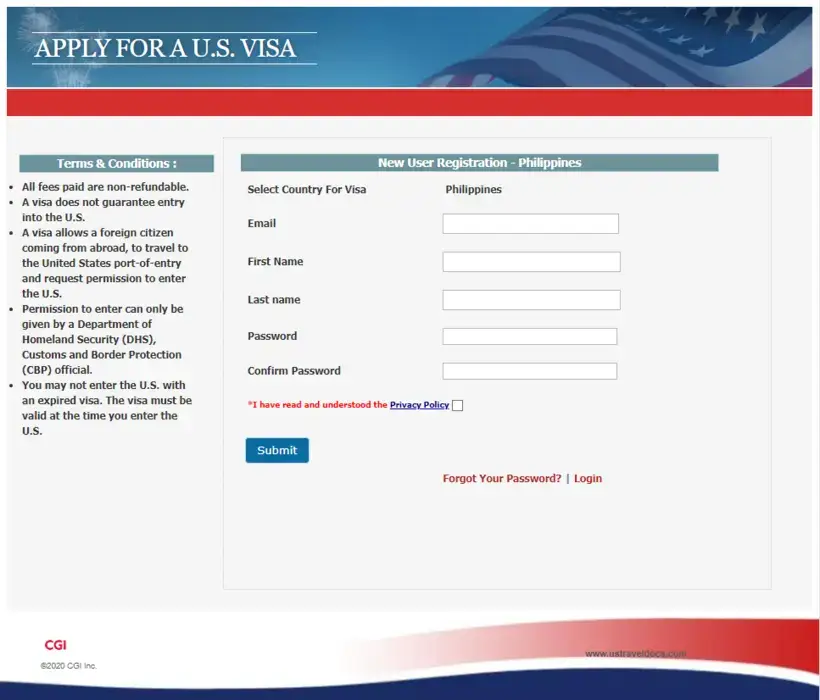
Navigate to the official website of the US Department of State’s Bureau of Consular Affairs. This is the primary platform for managing visa applications and appointments.
Step 2: Register or Create an Account
If you don’t have an account, you will need to register on the website. Provide the necessary information to create your account, including a valid email address.
Step 3: Log into the System
Once your account is set up, log in using your credentials. This will give you access to the personalized dashboard where you can manage your visa application.
Step 4: Click on “Schedule Appointment”
In the left-hand side menu of your dashboard, locate and click on the “Schedule Appointment” option. This will initiate the appointment scheduling process.
Step 5: Provide Required Information
Follow the prompts on the succeeding pages, entering the following information accurately:
- Visa Type: Indicate the type of visa you are applying for. Choose the category that aligns with your travel purpose.
- Personal Data: Enter your personal information as per your passport and other relevant documents.
- DS-160 Confirmation Number: Input the ten-digit barcode number from your DS-160 confirmation page.
- Family Members (if applicable): If you are applying with family members, provide their names and details as required.
- Preferred Method to Receive Passport: Select how you wish to receive your passport once the visa processing is complete.
- Visa Payment Confirmation: Confirm the payment of the visa application fee using the MRV fee payment receipt number.
- Appointment Schedule: Choose a convenient date and time for your visa appointment. Note that this can only be done after paying the visa application fee and completing the DS-160 form.
Important Note: Ensure that you have completed the DS-160 form and paid the visa application fee before attempting to schedule an appointment. The system will require confirmation of these steps before allowing you to proceed with the appointment scheduling process.
2. Over the Phone Option
Contact Information
- Telephone: For those who prefer the traditional approach, you can reach out to the customer service team by dialing either of the following numbers: (02)5488223 or (02)7928988. The lines are open on weekdays from 8 AM to 8 PM, excluding both Philippine and U.S. holidays.
- Web Call: Embracing modern technology, you can opt for a web call using browsers such as Firefox, Google Chrome, Safari 11, or Opera. A green button on the official page facilitates direct calls through your browser, ensuring a hassle-free connection.
- Skype: For a more personalized touch, add ‘ustraveldocs-philippines’ to your Skype contacts. This option provides an alternative means of communication for those who prefer the Skype platform.
Call Center Availability
Understanding the availability of the call center is crucial to ensure that your inquiries are addressed promptly. The call center operates on weekdays from 8 AM to 8 PM, with the exception of Philippine and U.S. holidays. This accessibility ensures that applicants have ample opportunities to connect with representatives during their visa application process.
Conversations with the customer service representatives can be conducted in either English or Tagalog, catering to the diverse linguistic preferences of applicants. This bilingual approach aims to make the communication process more comfortable and efficient for everyone involved.
Appointment Scheduling
Efficient scheduling is a key factor in streamlining the visa application process. Here are some important considerations when it comes to scheduling appointments:
- Optimal Timing: Select the earliest available schedule to avoid potential traffic issues and long queues at the U.S. Visa Assistance center. This not only ensures a smoother process for applicants but also helps in managing the center’s operations more effectively.
- Rescheduling Caution: While unforeseen circumstances may necessitate rescheduling, it’s essential to exercise caution in doing so. Applicants are allowed to reschedule their appointments twice, excluding the initial scheduling. However, if the second rescheduling attempt is canceled, a 90-day bar is imposed, restricting the ability to make a new appointment during this period.
7. Attend Your Interview at the US Embassy on the Scheduled Date and Time
We’ve now reached the pivotal stage of your U.S. visa application process: the much-anticipated interview. In this segment, I’ll provide you with insights into what you can anticipate on the day of your scheduled appointment.
To ensure a smooth and successful US visa application process, it is crucial to meticulously prepare all necessary documents as outlined in step 3 of the provided guide. Arriving at the US Embassy at least 30 minutes prior to your scheduled interview is advised to allow for any unforeseen delays and to ensure a timely check-in.
Additionally, consider bringing a companion to hold prohibited items, such as phones, cameras, and laptops, as these are not permitted within the Embassy premises. Be prepared for initial security checks upon arrival, including the inspection of bags and required documents by security personnel.
Subsequently, you will be guided to another line where you’ll await your turn to undergo the following procedures:
Pre-Screening
Before diving into the intricacies of the visa application process, it’s crucial to grasp the significance of the pre-screening phase. Consular officers play a pivotal role during this stage, seeking essential information to assess the suitability of the visa application. Key aspects of the pre-screening process include:
- Visa Type Clarification: The consular officer begins by delving into the specifics of the visa type you are applying for. Whether it’s a tourist visa, work visa, or any other category, understanding the nature of your visa is paramount.
- Purpose of the Trip: Providing clarity on the purpose of your journey is vital. Be prepared to articulate the reasons for your visit, whether it’s for leisure, business, education, or any other purpose. A clear and concise explanation goes a long way in the pre-screening process.
- Personal Data Gathering: To facilitate the processing of your application, consular officers will collect essential personal information, including your name, birthday, and marital status. Ensuring that this information is accurate and matches your official documents is imperative.
- Additional Photo Requests: In some instances, consular officers may request additional photos. Bringing extra copies of your identification documents, such as your passport, can expedite this part of the process.
Fingerprinting
Moving beyond pre-screening, the next crucial step involves the collection of biometric data, primarily through fingerprinting. This process aids in enhancing the security of the visa application system. Here’s what to expect during the fingerprinting stage:
- Providing Passport: Handing over your passport is the initial step. This allows consular officers to cross-verify your identity and link the biometric data to your application.
- Verbal Confirmation: You will be required to state your name and birthday verbally. This verbal confirmation helps in associating the biometric data with the correct individual.
- Fingerprint Scanning: Placing your fingers on the fingerprint scanner one by one is a standard procedure. This step is integral to the security measures undertaken by immigration authorities.
The Interview
The interview phase stands out as a critical component of the visa application process. Here’s a closer look at what this stage entails:
- Assigned Interview Window: Applicants are designated to specific interview windows, each managed by a consular officer. This face-to-face interaction allows the officer to assess the applicant beyond the paperwork.
- Assessment Based on DS-160 Form and Interview Questions: The consular officer uses the information provided in the DS-160 form as a foundation for the interview. Expect questions related to your background, travel history, and the specifics of your trip. Honest and clear responses are key.
- Varied Duration: While the duration of the interview can vary, it generally takes only a few minutes. A well-prepared and strong application can contribute to a quicker and more straightforward interview process.
8. Await the Release of Your Passport
Successful candidates can anticipate the issuance of their passports within just 5 working days. Conveniently, approved applicants can collect their passports at their chosen 2GO branch. To enhance communication, a notification system is in place, ensuring that individuals receive a text message from 2GO as soon as their passport is ready for pick-up at the specified location.
For added flexibility, should you need to change your pick-up location, it’s possible to update the Documentation Delivery Instructions until midnight on the day of your interview (refer to step 6). When collecting your passport, ensure you present a government-issued ID as part of the pick-up requirements, ensuring a secure and reliable document retrieval process.
Tips and Warnings for a Smooth US Visa Application Process
Tips
- Mandatory Embassy Attendance: All applicants, regardless of age, must attend the US Embassy for the visa interview. This is a crucial step in the process, and failure to appear may result in the denial of your visa application.
- Accompanying Minors: For minors (17 years old and below, unmarried), it is mandatory to be accompanied by at least one parent or a legal guardian during the visa interview. This ensures the well-being and proper representation of the minor during the application process.
- Document Authenticity: Only bring original, authentic documents to the interview. Ensure that government-issued IDs are valid and not expiring soon. Falsifying information or presenting fraudulent documents can lead to severe consequences.
- Consequences of Fake Documents: Submitting fake documents can result in the denial of your visa application and may lead to potential permanent bans from future US visa applications. It is crucial to maintain honesty and integrity throughout the application process.
- Overdeliver on Requirements: To be better prepared for the interview, consider submitting more than the required documents. This proactive approach can be advantageous in case the consular officer requests additional evidence to support your application.
- Travel History Advantage: Applicants with an extensive travel history are more likely to be approved. Presenting passport stamps, travel tickets, or bookings can create a positive impression and showcase your adherence to visa regulations.
- Timely Arrival: Arrive at the US Embassy 15 to 30 minutes before the scheduled interview, regardless of the appointment time. Priority is often given to applicants with early schedules, and punctuality reflects your commitment to the application process.
- Family Applications: Applying with family members, especially if you have previous travel experiences together, may increase the chances of approval. A family unit is perceived as less likely to overstay, providing a sense of security to the consular officer.
Warnings
- Purpose of Travel for Pregnant Women: Pregnant women intending to give birth in the US on tourist visas must prove they are seeking medical treatment and have the means to pay for it. Failing to do so may result in complications during the visa application process.
- Restrictions on “Birth Tourism”: A new visa restriction aims to treat pregnant women coming for birthright citizenship as foreigners seeking medical treatment. This policy seeks to curb the practice of “birth tourism” and may affect visa approvals for those with questionable intentions.
- Legal Consequences: Birth tourism agencies engaging in visa fraud or tax evasion may face legal consequences. It is imperative to be cautious and informed, ensuring that your visa application is in compliance with the law to avoid potential legal repercussions.
Frequently Asked Questions
1. Is it necessary to present ‘show money’ when applying for a US visa? What is the minimum required amount to display in my bank account?
Navigating the requirements for a US Visa involves recognizing the variability in demands placed upon applicants. The need for presenting a bank statement fluctuates depending on individual circumstances, with consular officers not consistently requesting this document. However, for regular employees, it remains a common prerequisite.
Financial preparedness is key, and although the US Embassy doesn’t provide specific guidelines on the minimum required amount in the bank statement, applicants are advised to rely on the experiences of those who have successfully obtained a visa.
To estimate the minimum ‘show money,’ travelers should factor in all international expenses, and some suggest a daily allocation of Php 10,000 to Php 15,000. Duration matters, as a Php 50,000 balance may suffice for a short stay but not for an extended visit. Visa duration guidelines recommend a bank balance range of Php 100,000 to Php 150,000 for a 10-day stay.
Consular officers may scrutinize bank account history, emphasizing the importance of a steady cash flow and discouraging sudden large deposits made just before the visa application, with the average monthly balance considered for legitimacy and to prevent deposits solely for visa purposes.
2. My visa application was rejected. What comes next?
Upon receiving a visa denial from the US Embassy, it is crucial to carefully review the specified reason for rejection. By thoroughly evaluating the grounds for denial, applicants can determine the manageability of the issue at hand. If the identified problem is deemed easily addressable, it is advisable to take immediate steps to rectify it.
Whether the issue involves incomplete documentation, insufficient financial proof, or other procedural matters, addressing and resolving the problem promptly is key.
Once the necessary steps have been taken to correct the deficiency, applicants can then proceed to reapply for the visa. It is important to note that by proactively addressing the identified issue, the likelihood of visa approval significantly increases, as it demonstrates a commitment to compliance and a genuine desire to meet all necessary requirements for entry into the United States.
3. My request for a visa has been declined. Is there any recourse available to overturn this decision?
Consular decisions on visa applications are conclusive and do not entertain appeals. However, individuals can proactively increase their likelihood of a successful application by addressing and improving personal circumstances before reapplying.
For tourist visa considerations, applicants are evaluated as potential immigrants, and it is crucial to exhibit strong ties to the home country, in this case, the Philippines. Indicators of such ties include:
having a spouse and children,
- a stable job,
- investments,
- properties,
- stocks,
- and maintaining a bank account with a substantial balance.
On the contrary, certain factors may raise red flags during the evaluation process, such as:
- being single,
- female,
- under 35 years old,
- unemployed,
- having an attractive appearance,
- or possessing a bank account balance less than Php 100,000.
Understanding and addressing these considerations can significantly impact the outcome of a tourist visa application.
4. My visa application was denied. Can I request a refund?
The visa application fee is non-refundable, and no money will be returned in the event of a cancellation. Refunds are not available for the visa application fee under any circumstances. Applicants are advised to carefully consider their travel plans and eligibility before submitting their application, as the payment for the visa application fee is final and cannot be reversed or reimbursed.
5. When am I eligible to submit a new application for a US visa?
When faced with a visa denial, it is crucial to reassess the circumstances leading to the rejection and take proactive steps to address them before reapplying. If the initial denial was attributed to a lack of travel experience, it is advisable to accumulate more travel history and firsthand knowledge of different cultures and regions.
Similarly, if the rejection was rooted in the absence of a stable job, consider reapplying after establishing a consistent employment record with the same company for a minimum of three years. For those who faced denial based on their single status, the solution may involve pursuing marriage and starting a family.
It is imperative to identify and rectify the specific issues that led to the initial denial, ensuring that subsequent applications stand a higher chance of approval due to positive changes in personal circumstances
6. Is there a specific timeframe within which I am allowed to re-apply?
There is no restriction on the number of times individuals can apply for a US Visa. Applicants are free to submit multiple visa applications without any limitations on the frequency or quantity of submissions. The process allows individuals to reapply for a US Visa as often as they wish, and there is no maximum limit imposed on the application process.
This flexibility enables applicants to pursue their travel aspirations persistently, ensuring that the opportunity to obtain a US Visa remains open and accessible.
7. What factors might lead the consul to reconsider and approve my visa upon reapplying?
Consul has the flexibility to reassess your visa application if there have been positive developments in your social, economic, or family circumstances. In the event that the factors contributing to your initial visa denial have undergone significant improvements, rendering you more eligible for the visa, the consul may choose to reconsider your case.
Demonstrating positive changes in your situation can substantially enhance your chances of a favorable outcome on a subsequent visa application. This underscores the importance of keeping the consulate informed about any positive shifts in your life circumstances that could impact your eligibility, providing an opportunity for a fair and updated evaluation of your visa application.
8. How do I go about securing a US visa for my nanny/caregiver/secretary?
To facilitate the US visa application process for your personal employee, follow these steps diligently.
- Firstly, access the provided link to fill out the DS-160 Form comprehensively.
- Subsequently, ensure the prompt payment of the US Visa Application Fee through convenient channels such as BPI Online, Bancnet Online, or any BPI branch.
- Once payment is confirmed, proceed to create a profile for your personal employee on this website.
- During this process, make certain to select ‘Domestic Employee’ as the designated visa category when prompted.
- It’s crucial to be aware that interview scheduling differs for personal employees; their interviews are set for 7:30 AM, while regular B1 or B2 application interviews commence at 9:00 AM.
9. How do I go about applying for a US visa for my baby or infant?
During your baby’s appointment at the US Embassy, ensure a smooth process by completing the green paper for applicants.
Clearly indicate that you are filling out the form on behalf of the applicant, marking ‘MINOR’ in the ‘REASON’ space. This step is crucial for streamlining the visa application for your infant.
Upon completion, you will receive a yellow Express Card, signifying priority status for your baby’s visa application.
Move through the process by undergoing initial screening at a designated window where your documents will be carefully checked.
Proceed to the ID verification window, where babies are exempted from fingerprint scanning if deemed too young.
Face the actual interview, where the primary question typically revolves around confirming that the application is for the baby’s visa only. If applicable, be prepared to present your own US visa during the interview.
After the interview, receive essential information from the consul regarding the outcome and the expected arrival time of your baby’s US visa, ensuring a clear understanding of the next steps in the process.
10. What is the duration of validity for a US Visa?
The type of visa one can obtain is contingent upon the assigned consul, with options typically falling into either Single-Entry or Multiple-Entry categories. The Single-Entry visa allows a traveler to enter the destination country once, while the Multiple-Entry visa permits multiple entries within a specified period.
Additionally, the validity period of visas varies, spanning from 3 months to 10 years, providing flexibility to accommodate different travel needs and durations. The specific visa requirements and duration are determined by the policies and regulations of the consulate or embassy responsible for processing the visa application.
11. I scheduled an appointment with the Embassy, but there’s an error in my application. What steps should I take now?
To ensure a seamless application process, it is imperative to meticulously fill out a new application form with precise and up-to-date information. Thoroughly verify all details on the new form to eliminate any potential errors. Subsequently, contact the US Embassy hotline for your designated appointment location. Clearly articulate your situation and apprise them of any inaccuracies identified on the old form.
Furnish the application number associated with the new form to facilitate the replacement of the erroneous one.
12. As a recent graduate with a bank account balance of less than Php 30,000, could my visa application face rejection?
For Minor Applicants, it is advisable to utilize their parents’ credentials and bank statements when applying for a visa. This includes presenting the financial stability and ties to the home country established by the parents.
Adult Applicants, on the other hand, will have their own credentials assessed, and to increase approval chances, it’s recommended to demonstrate ties to the Philippines over a couple of years. Job and Financial Stability are crucial factors, so securing a stable job for a significant duration and building a strong financial profile by increasing salary and proving connections to the home country are essential steps.
In terms of Travel History, it is beneficial to travel extensively to other countries to enhance visa approval prospects, as an impressive travel history is considered a positive factor for visa consideration. When Presenting Future Plans, applicants should emphasize aspirations such as attending graduate school or starting a business, showcasing commitments that indicate a strong intention to return to the home country.
If the trip is sponsored by parents, consulting a lawyer and drafting an Affidavit of Support, along with including necessary documents like bank statements and property titles, can strengthen the visa application.
13. Can one obtain a US visa to visit a romantic partner?
Securing a visa to visit a significant other in the United States, particularly for single individuals with a US citizen partner, presents slim chances. However, engaged couples have the option to apply for a different visa category, providing a potential avenue for a successful visit. The Family Reunification approach becomes more feasible when a child is involved, offering a more straightforward path for approval.
To enhance the likelihood of obtaining a visa, having a stable job, an impressive travel history, and substantial savings can significantly contribute to a favorable outcome. These factors demonstrate one’s ties to their home country and financial stability, assuring immigration authorities of the individual’s intention to return after their visit to the US.
14. The US visa is valid for a period of 5-10 years. If I renew my passport, will the remaining years of my visa still be applicable?
When undergoing a passport renewal or replacement process, it’s essential to note that your existing visa remains valid even after obtaining a new passport. Therefore, travelers are advised to bring both their new and old passports when journeying to the United States. This practice ensures smooth entry and authentication of the visa status.
To enhance convenience and organization, consider using a passport jacket, which provides a secure and compact way to store both passports together.
For the latest and most accurate information regarding travel regulations and documentation, it is recommended to consult the official US State Department website as a reliable source. This ensures that travelers stay well-informed and up-to-date with any changes or requirements for a seamless travel experience.
15. Could someone suggest a trustworthy agency in the United States that can assist me in obtaining a tourist visa?
When pursuing a visa, it is unnecessary to seek out a reliable agency for processing, as their services do not inherently increase approval chances. Agencies primarily play a limited role in facilitating the application submission process.
To significantly enhance the likelihood of visa approval, it is crucial to demonstrate substantial ties to the Philippines. This can be achieved by presenting concrete evidence of a stable and high-paying job, ownership of properties, wise investments, ample funds in the bank, and strong family connections.
These factors contribute to a comprehensive portrayal of one’s rootedness and commitment to their home country, which can positively impact the visa approval process.
16. Can a family or group application be submitted?
Yes. When submitting applications collectively as a family or group, streamline the process by following these simple steps. After completing the necessary details on the application, proceed to the ‘Confirmation’ page and click on ‘Email Confirmation.’
Upon doing so, you will be redirected to a ‘Thank You’ page, where you can choose the option to create a family or group application. This convenient feature allows applicable information from your initial application to be automatically imported, saving time and effort.
Despite this time-saving option, it is essential to note that it is still necessary to create individual applications for each family member or individual, even within a family or group application. This ensures that each person’s unique details are accurately captured and processed.