
Obtaining an NBI (National Bureau of Investigation) clearance, a crucial government-issued document often necessary for career-related endeavors, has historically been associated with apprehension. The prospect of enduring extensive queues and time-consuming application procedures deterred many.
However, in response to this, an innovative online appointment system was introduced, offering a potential solution to these challenges. This investigation aims to assess the extent to which this digital transformation has improved the overall NBI clearance application experience.
The culmination of this exploration is presented in the form of a comprehensive guide, serving as a valuable resource for both newcomers and those seeking renewal of their NBI clearances.
What Do You Need to Know About NBI Clearances?
NBI and Its Significance
The National Bureau of Investigation, commonly referred to as NBI, plays a pivotal role in the Philippines’ law enforcement landscape, akin to the United States’ Federal Bureau of Investigation (FBI). One of its key functions is issuing the NBI clearance, an official document that holds great importance in the lives of Filipino citizens.
This document serves as a testament to a person’s good standing and lack of any significant legal issues or pending cases. However, understanding the NBI clearance entails delving into its multifaceted purposes, application processes, and recent changes that have made it a more efficient and versatile document.
Purposes and Applications
The NBI clearance is a versatile document, demanded for various official purposes. It is a requisite in numerous scenarios, such as when applying for a job, seeking opportunities for education abroad, participating in civil service exams, or starting a business venture.
The NBI clearance serves as a means for organizations, institutions, and government agencies to verify an individual’s legal status, ensuring that they are free from any criminal liabilities. In many ways, it is an essential component of the application and verification process for a wide array of endeavors.
NBI Clearance vs. Police Clearance
While both NBI clearance and police clearance share the common goal of validating an individual’s legal status, they differ in a few notable aspects. NBI clearance typically has a broader scope and might take longer to process due to its comprehensive database. On the other hand, police clearance is more focused on local or regional records and is generally quicker to obtain.
Additionally, NBI clearance is increasingly favored by many due to its improved accessibility and efficiency, which can be attributed to the shift towards an online appointment system in 2015 and the introduction of a multi-purpose ID format in 2017. These changes have not only simplified the application process but also made the NBI clearance more adaptable for a variety of purposes.
What Is the Validity Period of NBI Clearance in the Philippines?
The validity period of NBI Clearance in the Philippines is relatively concise, lasting for one year from the date of issuance. This means that once you receive your NBI Clearance, it is officially recognized as a valid document for a 12-month duration from the date it was issued.
It is important to keep track of this period to ensure that the clearance remains current and applicable for various official purposes, such as job applications, travel, or any situation where your legal standing needs to be verified. Staying mindful of the expiration date is crucial to avoid any inconveniences or delays in your endeavors that require the presentation of an NBI Clearance.
What Are the Requirements for NBI Clearance?
Whether you are a first-time applicant, seeking a renewal for an NBI clearance issued before 2014, or need corrections, including minor changes like a single-letter alteration, specific requirements and documentation must be met accordingly.
1. Two Valid Government-Issued IDs
When applying for an NBI Clearance, having the appropriate government-issued identification is crucial to establish your identity and legal standing. The NBI (National Bureau of Investigation) recognizes a variety of official IDs to facilitate the application process. Here is a comprehensive list of valid government-issued IDs that you can use for your NBI Clearance application:
- UMID (Unified Multi-Purpose ID) – Issued by: Social Security System (SSS) and Government Service Insurance System (GSIS)
- Passport – An internationally recognized travel document
- Philhealth ID – Issued by: Philippine Health Insurance Corporation
- Voter’s ID or Certificate of Registration – Issued by: Commission on Elections (COMELEC)
- BIR/TIN ID – Issued by: Bureau of Internal Revenue (BIR)
- PRC License – Issued by: Professional Regulation Commission (PRC)
- Driver’s License – Issued by: Land Transportation Office (LTO)
- Pag-IBIG ID – Note: The Loyalty Card is not accepted.
- PSA-Authenticated Birth Certificate – Issued by: Philippine Statistics Authority
- Postal ID – Issued by: Philippine Postal Corporation
- Police Clearance – Note: Acceptance may vary; consider alternatives.
- Certification from the Local Civil Registrar
- Certification from Malacanang – Related to indigenous groups, tribal membership, or foundling status
- Solo Parent ID
- Seaman’s Book and SIRV (Special Investor’s Resident Visa)
- Senior Citizen ID
- MARINA ID (Maritime Industry Authority)
- Company ID – For government employees
- School ID with current registration card
Special Note for First-Time Job Seekers: For first-time job seekers, specific requirements must be met:
- A valid PSA Birth Certificate or a Philippine passport is required as the first valid ID.
- The second valid ID can be any from the list above, as long as it bears your photo and signature. It’s important to note that you cannot use both a passport and a birth certificate as they are considered the same by the NBI Clearance office.
Ensuring that you have the correct identification documents from this list will streamline your NBI Clearance application and help you avoid unnecessary delays. Remember to check for any specific requirements or updates from the NBI office, as acceptance may vary over time.
2. Required Documents for First-Time Job Seekers
For first-time job seekers in the Philippines, obtaining an NBI (National Bureau of Investigation) clearance under the First Time Jobseekers Assistance Act can be a cost-free endeavor. However, to avail this benefit, certain requirements must be met. Two essential documents, the Barangay Certification and the Oath of Undertaking, play a pivotal role in the application process.
Barangay Certification: Demonstrating Residence and Job Seeker Status
- First-Time Job Seekers Only: The Barangay Certification is exclusively required for first-time job seekers seeking a free NBI clearance under the First Time Jobseekers Assistance Act. This means that if you are not a first-time job seeker, you may not need to provide this document.
- Residence Validation: The Barangay Certification serves as a verification of your residence. To be eligible, you must demonstrate at least six months of residence in your current location.
- Confirmation of Job Seeker Status: Beyond confirming your residence, this document also attests to your first-time job seeker status, ensuring that you meet the criteria for this particular NBI clearance application.
Oath of Undertaking: Acknowledging Legal Responsibilities
- Applicant’s Responsibility: The Oath of Undertaking is a legal document that must be completed by the applicant. It serves as an acknowledgment of the applicant’s legal responsibilities and the accuracy of the information provided during the application process.
- Barangay Captain/Chairman’s Signature: This document is to be signed before the Barangay Captain or Chairman, who is an authorized signatory for the Oath of Undertaking.
- NBI-Provided Template: It’s important to note that there are specific templates for both the Barangay Certification and the Oath of Undertaking mandated by the NBI office. Deviating from these templates may result in the rejection of your NBI clearance application. Therefore, it is essential to adhere to the prescribed formats and ensure the accuracy of the information provided in these documents.
These requirements for the Barangay Certification and Oath of Undertaking are unique to first-time job seekers and are crucial to availing the benefits of a free NBI clearance. It’s advisable to liaise with your local barangay officials and the NBI office to ensure that you meet all stipulated criteria and adhere to the prescribed templates for these documents.
3. Important Notes and Additional Details
Applying for an NBI (National Bureau of Investigation) clearance demands attention to detail and adherence to specific procedures. Here are some essential reminders and additional information to ensure a smooth application process:
Online Application Details
- Provide Valid ID Information: When completing the online application, you will need to provide the names of the two valid IDs you intend to bring on your appointment day. These IDs play a crucial role in verifying your identity.
- Select Primary ID: In the first box provided during the online application, you should specify your primary ID. This selection is critical as it assists NBI personnel in verifying your identity.
- Specify Second Valid ID: In the second box, you should specify the other valid ID you intend to bring for verification, even if it’s not included in the drop-down list. This ensures a comprehensive validation process.
Non-Accepted IDs
- Company ID (unless you’re a government employee): It’s important to note that company IDs are generally not accepted for NBI clearance applications, with the exception of government employees. Ensure you have an alternative valid government-issued ID to present.
- Barangay Clearance: The Barangay Clearance is not considered a valid government-issued ID for NBI clearance application purposes. Be sure to select an accepted ID from the provided list.
- Non-Government-Issued IDs: Apart from company IDs and Barangay Clearance, other non-government-issued IDs are not accepted. This emphasizes the importance of possessing a valid, government-issued ID for your application.
Valid ID Verification
NBI personnel will meticulously verify the validity and authenticity of the IDs you present during your appointment. To ensure a hassle-free process, keep the following in mind:
- Your ID should be government-issued, original (not a photocopy), and in good condition.
- The text on the ID should be legible.
- The photo on the ID should be recent and clearly recognizable.
Renewal Applicants
For those renewing their NBI clearances, specific requirements apply. If your NBI clearance was issued from 2014 onwards, you will need to bring one valid government-issued ID and a copy of your previous clearance. This ensures a seamless renewal process and helps verify your identity.
Adhering to these reminders and additional information is crucial to a successful NBI clearance application. Be sure to double-check the requirements, prepare your valid IDs, and follow the specified procedures to avoid any delays or complications during the application process.
How Do I Get NBI Clearance Online in the Philippines?
Obtaining NBI Clearance online involves using the new application system, which follows a process similar to applying for a Philippine passport, and it’s relatively straightforward.
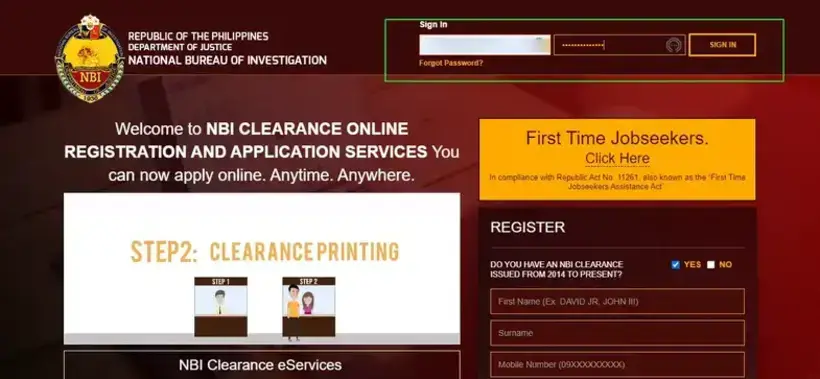
1. Visit the NBI Clearance Online Services Website
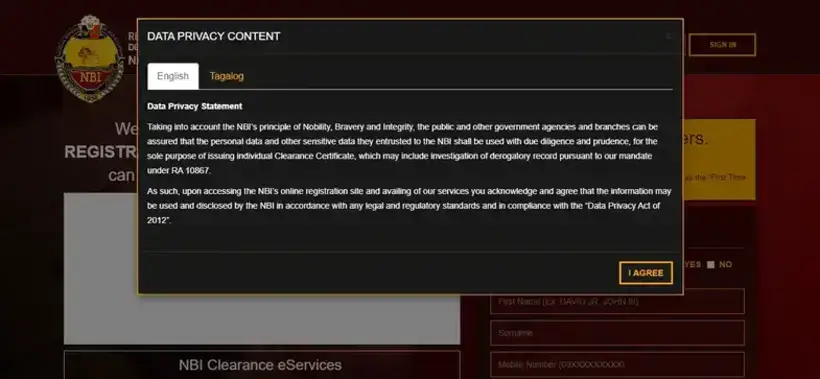
Begin by reading the Data Privacy Statement, then click “I Agree.” Next, review the additional reminders, and finally, click “Close.”
2. Sign Up to Create an Account
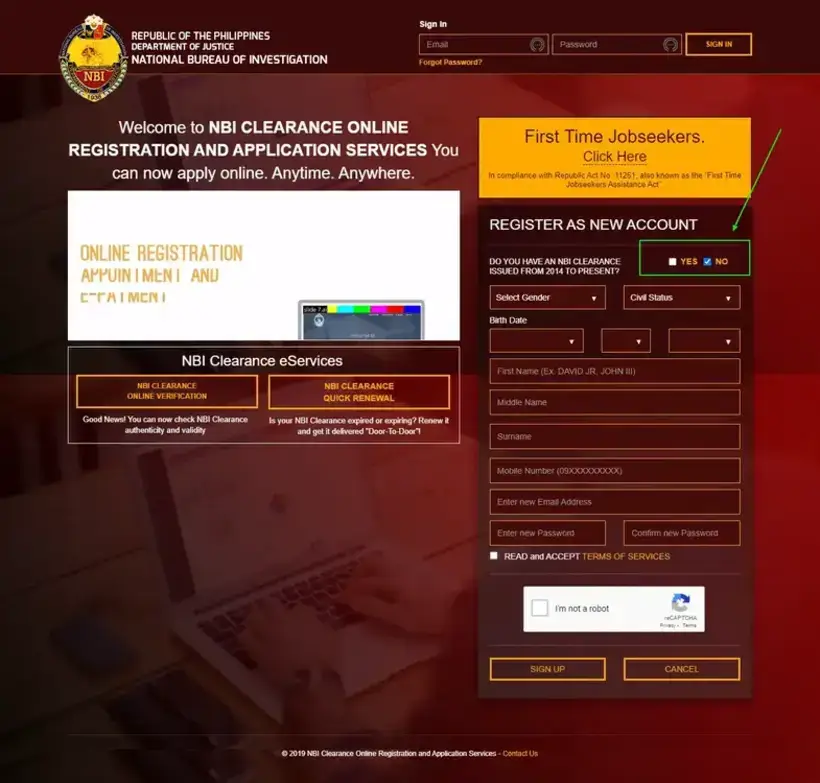
Step 1: Determine Eligibility for Free NBI Clearance
- Check if you qualify as a first-time job seeker for a free NBI clearance.
- Click the “First Time Jobseekers” yellow box if applicable.
- Proceed with the regular application if you are not a first-time job seeker.
Step 2: Confirm Renewal Status
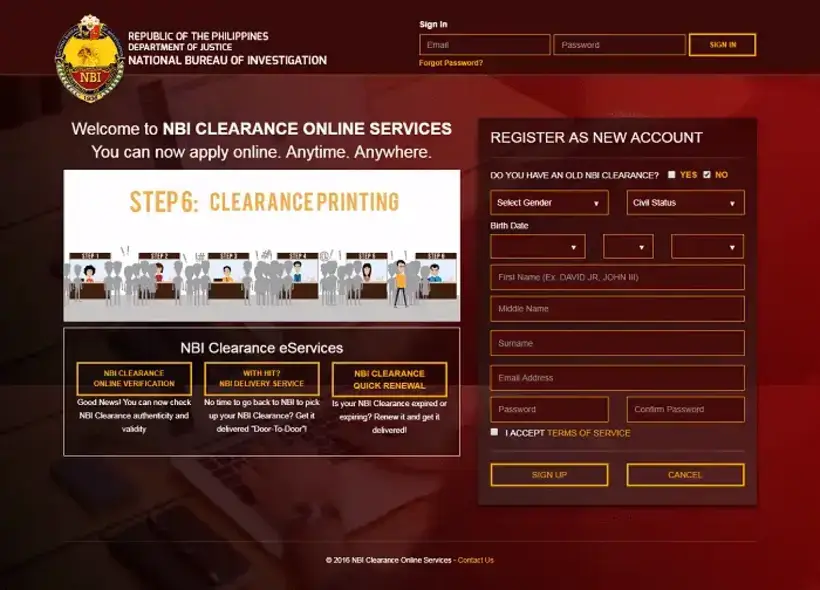
Select “NO” for the question, “DO YOU HAVE AN OLD NBI CLEARANCE ISSUED FROM 2014 TO PRESENT?”
Step 3: Fill Out Registration Form
- Provide accurate personal information in the registration form.
- Omit special characters, such as hyphens, in your name if applicable.
- You can request the inclusion of hyphens on your appointment day before printing the NBI clearance.
Step 4: Email Policy
Adhere to the “one email = one user” policy, allowing only one email for each account.
Step 5: Verify Information
Double-check that all provided personal details are accurate and complete.
Step 6: Accept Terms and Confirm Identity
- Tick the box to indicate that you’ve read and accepted the Terms of Services.
- Mark the box to confirm your identity as a human user.
Step 7: Complete Registration
Click “Sign Up” to initiate the application process.
3. Input the One-Time Password Sent to Your Registered Phone Number
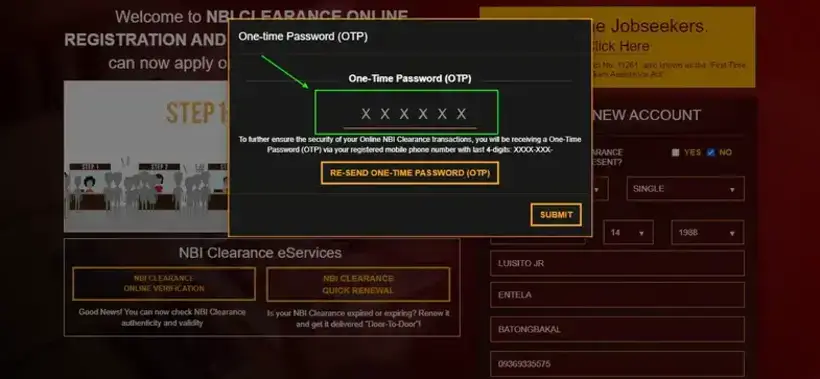
Step 1: Know the Role of OTP
One-Time Password (OTP) serves as an additional security layer for online NBI clearance transactions, safeguarding your data.
Step 2: Request a New OTP
If you haven’t received an OTP, click “RE-SEND ONE-TIME PASSWORD (OTP)” to generate a new one, ensuring you have access to this vital security code.
Step 3: Multiple Delivery Options
Check not only your registered mobile number but also your registered email address for the OTP. This provides flexibility and accessibility.
Step 4: Enter and Submit OTP
- Upon receiving the OTP, input the numbers accurately in the designated field.
- Click “Submit” to advance to the next phase of your NBI clearance application, knowing your transaction is now even more secure.
4. Access Your Account By Logging In
To access your account, sign in using the email and password you supplied during the registration.
5. Complete the Applicant Information Form

Step 1: Access the Applicant Information Page
After logging in, navigate to the Applicant Information page.
Step 2: Provide Additional Personal Details
- Enter middle name, civil status, birthplace, address, and more as requested.
- Note that information marked with a red asterisk is mandatory.
Step 3: Formatting Guidelines
Ensure that all information provided contains only letters and spaces. Avoid using commas and periods.
Step 4: Save Your Information
Click the “Save Information” button located at the bottom of the page once you have filled out the form.
Step 5: Review and Confirm
- A pop-up box will appear, allowing you to review the information entered.
- If you are confident in the accuracy and completeness, click “Submit” to proceed with your NBI clearance application.
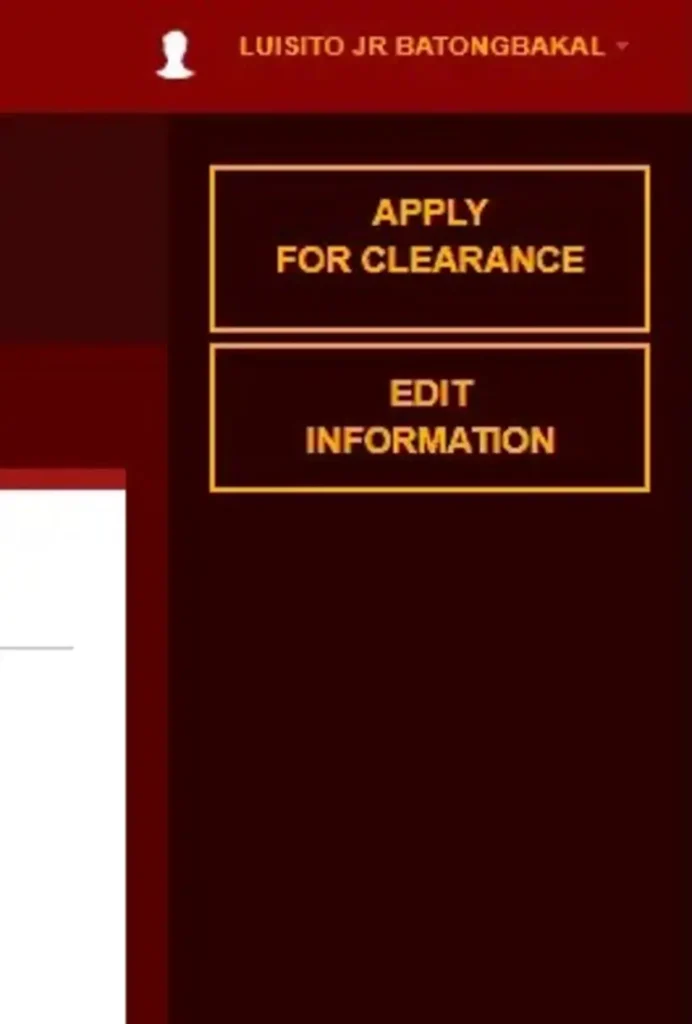
6. Choose the ‘Apply for Clearance’ Option
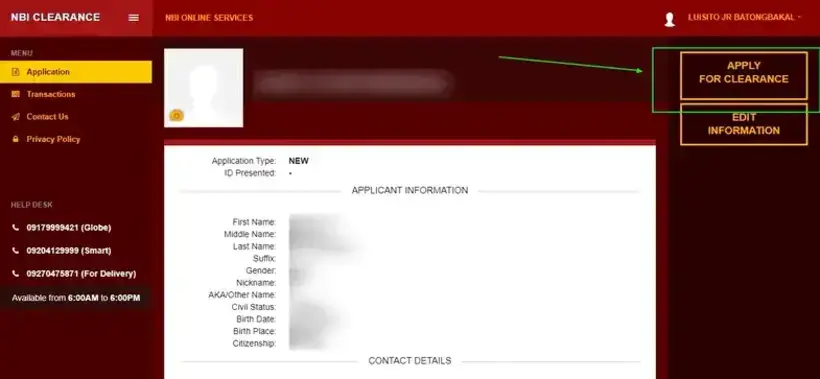
Upon saving your personal information, continue by selecting the “Apply for Clearance” button, found at the top of the screen for mobile users or in the upper right corner of the page for desktop and laptop users.
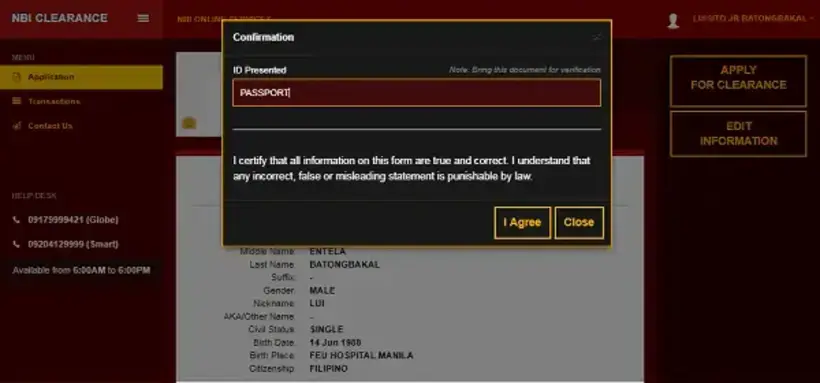
7. Specify the Type of ID and Its ID Number for Verification on Appointment Day
You will encounter a pop-up box where you should enter the type of valid ID and its associated ID number for verification. Remember to have a minimum of two valid IDs as supporting documents for your appointment day. To proceed to the next page, click “I Agree.”
8. Select Your Preferred NBI Branch

Step 1: Choose Your Location
You have the option to select either the main branch located at UN Avenue, Manila, or any nearby NBI branch.
Step 2: Convenient Branch Network
NBI branches are strategically situated throughout Manila and the entire country for your convenience.
Step 3: Branch Adjustment
- If you have already paid the processing fee but now wish to process your NBI clearance at a different branch than originally selected, you can make this change.
- To do so, contact the original branch and request a record transfer.
Step 4: Ensure Proper Endorsement
Keep in mind that you must have the appropriate endorsement to process your application at a different branch; this change cannot be made without it.
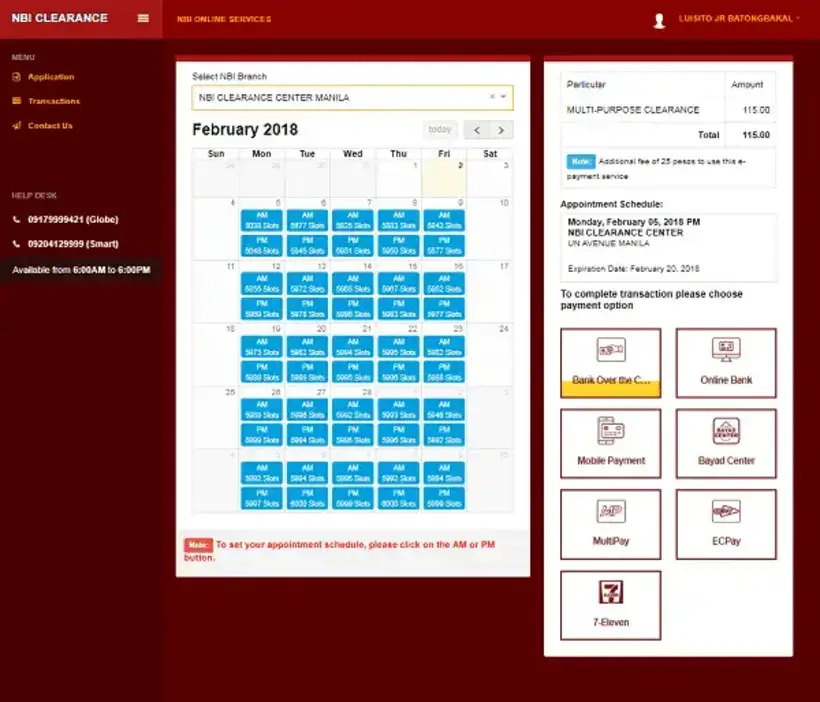
9. Choose Your Desired Appointment Date and Time
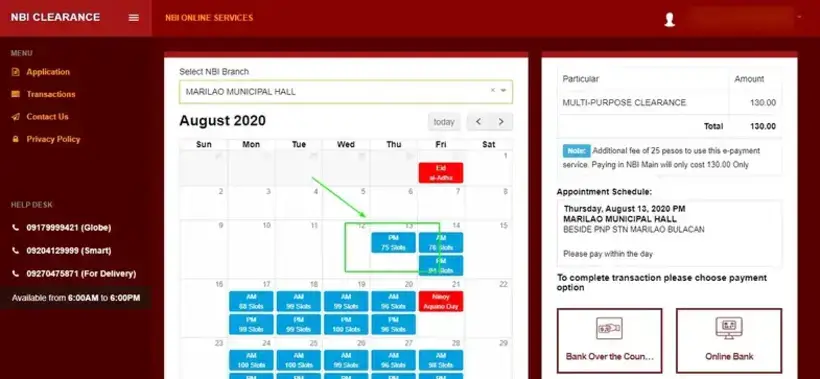
Step 1: Choose Your Branch
Start by picking your preferred NBI branch from the drop-down list provided.
Step 2: Appointment Date and Time
Next, select your appointment date and time, with the options of either AM or PM. These available slots are highlighted in blue for your convenience.
Step 3: Caution on Date Selection
It’s important to exercise caution when selecting the appointment date, as changes or rescheduling are not allowed once the NBI clearance fee has been paid.
Step 4: Flexibility for Paid Applicants
If you’ve already paid but are unable to make it on the appointed date, don’t worry. You have an additional 15 days to complete your application at the NBI clearance branch of your choice, granting you some flexibility in your scheduling.
10. Select Your Payment Method
Diverse Payment Choices
Securing your NBI clearance is now more accessible than ever, thanks to the array of payment methods at your disposal. These options cater to various preferences and ensure a smooth transaction process. Here are the available payment methods:
- Bank Over The Counter: Pay at your convenience at various participating banks, including prominent institutions like BDO, Metrobank, Chinabank, Landbank, RCBC, Eastwest Bank, Union Bank, Security Bank, and PNB, among others. This traditional payment approach allows you to settle fees in person at bank branches.
- Online Bank Payment: Harness the power of online banking partners such as BDO Internet Banking, BPI Express Online, Unionbank EON, and several others. These online platforms offer a hassle-free and time-efficient way to pay your NBI clearance fee.
- Cash Payments: Opt for cash payments by visiting Bayad Center outlets or affiliated partner locations, such as Cebuana Lhullier, LBC, Villarica Pawnshop, Waltermart, Robinsons, SM Savemore, and many more. This option ensures that you can conveniently pay in cash without hassle.
- ECPay: Choose ECPay payment partners, including RD Pawnshop, Petron Corporation, wExpress, and a variety of others. ECPay’s widespread network of payment centers provides added convenience for a diverse range of users.
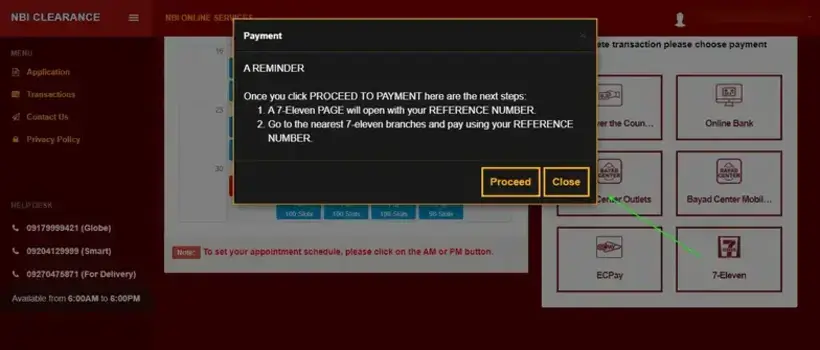
- 7-Eleven: For added ease and accessibility, you can complete your payment at a nearby 7-Eleven branch. These outlets are conveniently located and offer flexible payment options.
- Visa/Mastercard: Make use of your Visa or Mastercard-powered debit or credit card for NBI clearance fee payment. This electronic method provides a secure and rapid way to settle your dues.
- Mobile Wallet Apps: Embrace digital payment avenues by downloading mobile wallet apps like GCash and PayMaya. These apps enable convenient and cashless payments using your smartphone.
- Other Digital Platforms: Explore additional digital payment platforms, including Shopee Pay credits and the DragonPay app, for more choices in how you settle your NBI clearance fee.
Easy Payment Process
Select your preferred payment method directly on the same page. A pop-up box will then guide you through the process, offering clear instructions on how to complete the payment via your chosen channel. After finalizing the payment, click “Proceed” to advance to the next step in your NBI clearance application, ensuring a seamless and hassle-free payment experience.
11. Settle the NBI Clearance Payment
Obtaining your NBI clearance involves a seamless payment process and the essential documentation required for a successful application. Here are the steps to guide you through this vital phase:
1. Transaction Summary
Before proceeding with payment, it’s crucial to review your transaction summary. This summary includes details about the NBI clearance fee, which, as of the current information, amounts to PHP 130, with an additional PHP 25 for e-payment service.
2. Proceed to Payment
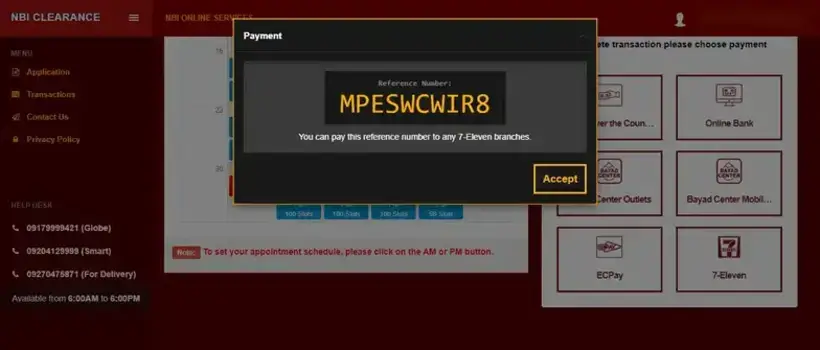
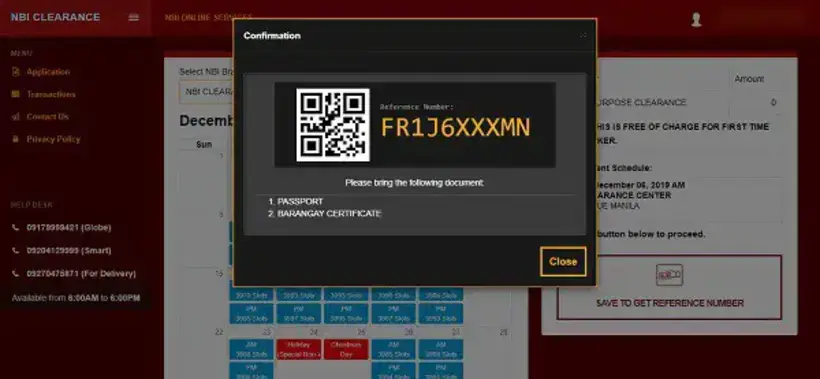
After reviewing the transaction summary, click the “Proceed to Payment” button based on your chosen payment channel. This action will redirect you to either an online banking portal or a pop-up box containing an alphanumeric reference number that is key to the payment process.
3. Note Your Reference Number
The reference number is a critical component of your NBI clearance application. Make sure to jot it down or take a screenshot, as it serves as your entry pass to the NBI clearance center. This number will be required for payment and verification.
4. Check Application Status
To stay updated on the progress of your application, click on “Transactions” in the menu. This section will display your reference number along with information about your payment status.
5. Payment Confirmation
Following payment, be vigilant about checking your email for a payment confirmation message. Additionally, you can return to the Transactions page on the NBI Clearance website to see if the status has transitioned from “Pending” to “Paid.”
6. Printing Application Form (Optional)
Although not mandatory, you have the choice to print the application form for your records. Mobile users may need to adjust the browser window size to accommodate the print button.
7. Alternative to Printing
If you lack access to a printer, there’s an alternative option. You can simply note down your reference number or capture a screenshot using your mobile device. This will serve as the document presented to NBI personnel on your appointment day.
8. Appointment Day
On the scheduled appointment day, ensure you have the application form (or reference number) and your valid IDs in hand. This is when your photo and fingerprint biometrics will be collected, marking the final steps toward obtaining your NBI clearance.
12. Proceed to the NBI Clearance Center for Photo and Fingerprint Biometrics
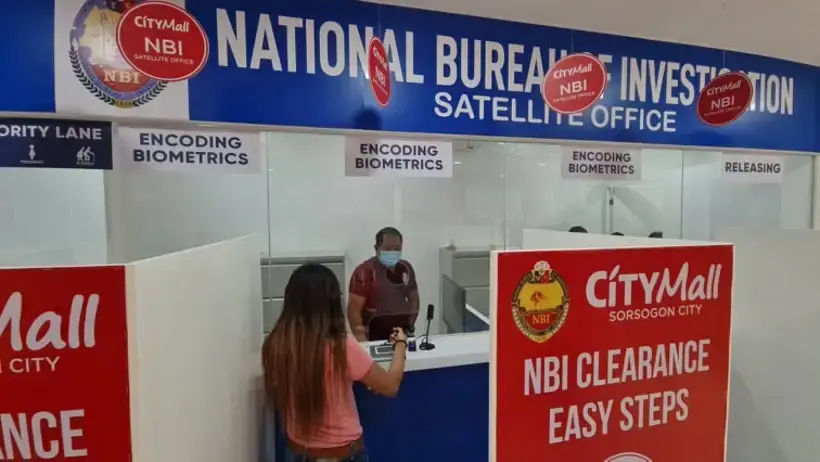
When the day of your appointment arrives, make your way to the NBI clearance center you previously selected. Ensure you have all the necessary documents in hand, including your application form or reference number, which will serve as your entry pass. NBI personnel or security guards will be on-site to assist you throughout the process.
Following the initial check-in, proceed to the encoding station, where your biometrics and photograph will be captured. This marks the final step in securing your NBI clearance, and you’ll be one step closer to your document.
13. Collect Your NBI Clearance
In the absence of any “hit,” signifying that there are no concerns related to your name, you can expect to receive your NBI clearance within a matter of minutes. However, if there is a match or any irregularity in your application, you will be requested to return after a few days to address and resolve the issue.
What Should I Do If I Received a “Hit” on My NBI Clearance?
When your NBI clearance application is tagged with a “hit” status, it’s essential to understand the implications and how it relates to criminal records.
How NBI Clearance “Hit” Works
- Database Search: During the NBI clearance application process, NBI personnel conduct a comprehensive search of the criminal database to find any records associated with the applicant’s name. These records are often referred to as “derogatory records.”
- “Hit” Occurrence: A “hit” status occurs when the database search returns a result that raises suspicion, whether the criminal case is linked to the applicant or a namesake. This distinction is crucial because it might not necessarily be your criminal record that triggered the “hit” status.
- Exclusion of Civil Cases: It’s important to note that NBI clearance does not encompass civil cases such as annulments, ejectments, and money claims. These types of cases are not included in the criminal database search.
Sources of NBI Criminal Database
Comprehensive Data: The NBI Criminal Database is an extensive compilation of records from various sources. These sources include courts such as MTC, MTCC, MCTC, and RTC, as well as prosecution services from City and Provincial Prosecution Offices, Ombudsman, Sandiganbayan, police records, AFP records, and other relevant entities.
Effectiveness in Tracking Criminals
- Aiding Law Enforcement: The “hit” status has proven to be an effective tool for the NBI in tracking down individuals who may have been evading the law.
- Not Always Legal Action: It’s crucial to understand that not all “hit” status applications result in immediate arrest or legal action. The verification process is necessary to ascertain whether the criminal case is genuinely associated with the applicant or if it’s a case of namesake confusion.
Verification Process
Delay in Clearance Issuance: When a “hit” status is encountered, the NBI temporarily postpones the issuance of the clearance. This delay is essential to conduct further verification and ensure the accuracy of the information.
How many days does it take to process an NBI clearance if you have a ‘hit’ status?
Individuals with a “hit” status are subject to a waiting period, which typically spans between five to ten days. This interlude provides NBI researchers with the opportunity to conduct a thorough evaluation to ascertain whether the “derogatory records” discovered are linked to the applicant or a namesake.
If the investigation uncovers no incriminating evidence associated with the applicant, they are permitted to return to the NBI office after the waiting period, where they can obtain their clearance without incurring any additional fees.
However, it is crucial to understand that the NBI retains the final say in determining which applicants will be granted clearances following this waiting period. In certain instances, applicants may be directed to the Quality Control division for more comprehensive examination, as outlined in the subsequent section.
What Will Happen if a Criminal Case Triggers the “Hit” Status?
When your NBI clearance application is flagged with a “hit,” a Quality Control Interview is typically required to determine the nature of the “derogatory records.” Here’s what you need to know:
Preparation for the Interview
If the derogatory records are linked to you or a namesake, you will be summoned to attend the “NBI Clearance Quality Control Interview.” This interview is not a cause for concern, especially if you have no criminal history and are not a fugitive. To ensure a smooth interview process, gather the following documents:
- At least two valid IDs or documents for identity verification.
- NBI Clearance Official Receipt and print-out of your online registration/application form.
- If the derogatory records pertain to you, provide the original and photocopy of the Court Decision/Certification proving the dismissal of the criminal case.
- If the derogatory records belong to a namesake, the NBI Agent will provide an Affidavit of Denial, which you must sign. This affidavit attests that you share the same name as the person involved in a criminal case but are not the same individual. This step helps clear your name and prevent future “hits.”
Conduct of the Interview
The Quality Control Interview takes place at the NBI main office’s Quality Control Section, situated on UN Avenue, Manila. The office operates from 7 AM to 5 PM, and applicants are accommodated on a first-come, first-served basis.
Several NBI satellite offices also have designated interview rooms, providing an alternative to the main office. These locations include:
- NBI Quezon City Satellite Office (open from 8 AM to 5 PM),
- NBI Muntinlupa Satellite Office (8 AM to 5 PM), and
- NBI Las Piñas Satellite Office (8 AM to 5 PM).
Clearance Issuance After Interview
Once you successfully prove that the case was dismissed or that you are not the person involved in the case, your NBI clearance will be issued immediately. Applicants with pending cases in Courts will also receive their clearances, although these cases will be reflected on their clearance upon release.
What Are the Requirements and Application Process for Free NBI Clearance for First Time Job Seekers?
In April 2019, a significant development unfolded in the Philippines as President Rodrigo Duterte signed into law Republic Act No. 11261, commonly referred to as the First Time Job Seekers Assistance Act. This transformative legislation marked a pivotal shift in government support for aspiring professionals, aiming to alleviate the financial burden associated with securing essential documents required for employment.
While its implementation required some time, a notable milestone came with the official update on the NBI clearance website. Under this act, first-time job seekers gained the invaluable opportunity to apply for various crucial government documents, including NBI clearance, without incurring any fees.
This remarkable list encompasses police clearance, birth certificates, barangay clearances, tax identification numbers (TIN), medical certificates, marriage certificates, and UMID cards, among others. However, the privilege comes with the restriction of being available only once to deter potential misuse.
This guide will delve into the intricacies of how first-time job seekers can obtain their free NBI clearance, shedding light on a significant policy change that has the potential to positively impact countless individuals in their quest for employment.
Who Qualifies for the Free NBI Clearance for First-Time Job Seekers?
Obtaining a free NBI clearance as a first-time job seeker is an appealing prospect for many young Filipinos embarking on their career journeys. To be eligible for this privilege, certain qualifications must be met to ensure that those who genuinely need assistance in securing employment-related documents can benefit from this policy.
- Must be a Filipino Citizen: First and foremost, to qualify for the free NBI clearance under the First Time Job Seekers Assistance Act, individuals must be Filipino citizens. This requirement ensures that the benefits of the law are reserved for Filipino job seekers, acknowledging the importance of supporting local talent in their pursuit of employment opportunities.
- Must Have Resided in Their Barangay for at Least Six Months: A key eligibility criterion is a minimum residence requirement. Aspiring job seekers must be able to demonstrate that they have been residents of their respective barangays for at least six months. This provision encourages local community engagement and helps prevent abuse of the benefit by newcomers to the area.
- Must Be Actively Seeking Employment: Another critical qualification for availing of the free NBI clearance is active job seeking. Applicants must demonstrate their commitment to finding employment, as this policy aims to assist those earnestly searching for work opportunities.
- Must Be a First-Time Job Seeker: The most defining eligibility criterion is that the individual must be a first-time job seeker. This means they have never been employed before, and this is their initial foray into the job market. This distinction is crucial to ensure that the benefit is directed towards those who are new to the world of work and need assistance in obtaining essential documents.
Categories of First-Time Job Seekers
First-time job seekers come from various backgrounds and situations, and the law recognizes this diversity by categorizing them into specific groups. These categories encompass a wide range of individuals, making the free NBI clearance accessible to different segments of the job-seeking population:
- Fresh Graduates: Recent graduates with a bachelor’s degree, technical-vocational course certification, or high school diploma obtained through the K-12 program form a significant category of first-time job seekers. This group includes young professionals eager to start their careers with the academic qualifications they have earned.
- Early School Leavers and Out-of-School Youth (OSY): The law also extends its support to early school leavers and out-of-school youth, recognizing that not all job seekers follow a traditional educational path. Whether due to personal circumstances or other reasons, these individuals are given the opportunity to obtain a free NBI clearance to facilitate their entry into the workforce.
- Unemployed and Non-Secondary Education Completers: For those who have never been employed, are not currently employed, and have not completed secondary education, the free NBI clearance option remains available. This category covers a broad spectrum of job seekers who may have faced challenges in gaining prior work experience or academic qualifications.
- Students Taking Leave of Absence: Students who find themselves on a temporary leave of absence from a college, university, or technical-vocational institution but plan to work during their time off can also benefit from the free NBI clearance policy. This provision supports those pursuing a balance between education and employment.
- Working Students: Finally, the law recognizes that some individuals choose to work while enrolled in an educational or vocational course. This category ensures that working students can access the free NBI clearance, as their unique circumstances often require them to navigate both work and education simultaneously.
What Are the Requirements for NBI Clearance for First-Time Job Seekers?
1. ID Requirements
When applying for an NBI Clearance as a first-time job seeker, it’s crucial to have the appropriate identification documents in order. Here’s a breakdown of the ID requirements:
- Two (2) Valid IDs: The first and foremost requirement is the submission of two valid identification documents. These IDs serve as primary proof of your identity and are essential for processing your NBI Clearance.
- PSA Birth Certificate and Valid ID: One of the accepted combinations for your identification includes your PSA Birth Certificate along with one of the valid IDs recognized by the NBI Clearance office. This combination validates both your birth details and your identity.
- Philippine Passport and Valid ID: Alternatively, if you possess a Philippine passport, you can use it in place of the PSA Birth Certificate. You still need to provide one of the valid IDs to support your identity.
Important Note: It’s worth noting that you cannot submit both your PSA Birth Certificate and your Philippine passport together as they are considered equivalent documents by NBI Clearance offices. You should choose one or the other, along with a valid ID, to meet the identification requirements for your NBI Clearance application.
2. Other Important Requirements
Obtaining an NBI Clearance as a first-time job seeker comes with specific requirements to ensure a smooth application process. Here is a breakdown of the essential documents and information you need to prepare:
Original and Photocopy of Barangay Certificate and Oath of Undertaking: Both the original and a photocopy of the Barangay Certificate and Oath of Undertaking are required for your NBI Clearance application. These documents must have been issued not more than one year before your application date.
The Barangay Certificate should certify at least six months of residence in the barangay and confirm your first-time job seeker status. Download an editable Template here.

The Oath of Undertaking must be executed before the Barangay Captain or their authorized officer and can be obtained from the Barangay Hall. Download an editable template here.
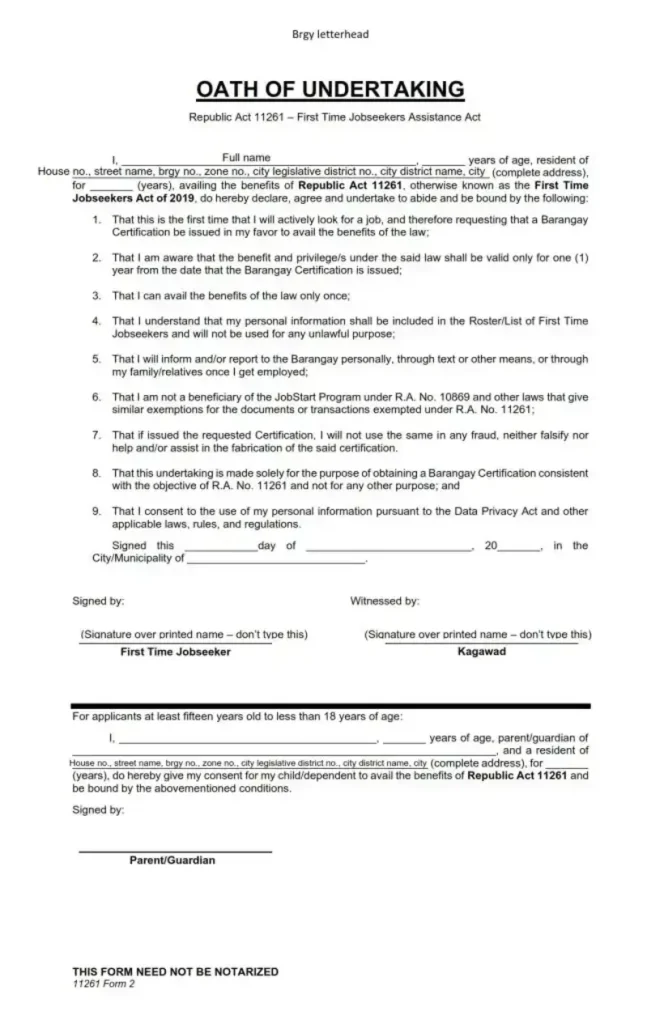
Use NBI-Provided Templates: Specific templates for the Barangay Certification and Oath of Undertaking are required by NBI Clearance offices. It’s essential to use the provided templates to ensure your documents meet the necessary criteria. Failure to comply with these requirements may result in the rejection of your NBI Clearance application.
Reference Number: To initiate the application process, you must secure an appointment online. This appointment will generate a unique reference number, which you will need during your visit to the NBI Clearance center.
Ensuring that you have all these requirements in order will help streamline the application process and increase your chances of a successful NBI Clearance application as a first-time job seeker.
How Can I Obtain Free NBI Clearance as a First-Time Job Seeker? Follow this Step-by-Step Guide
1. Visit the NBI Clearance Online Services Website
Start by visiting the official NBI Clearance Online Services website.
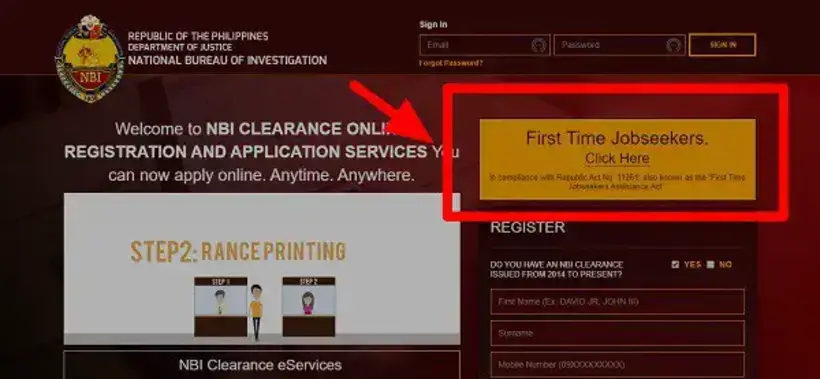
- Locate the Dedicated Section for First-Time Job Seekers: On the website, look for the distinct yellow section dedicated to first-time job seekers. This section is tailored to guide individuals who are new to the workforce through the application process.
- Click the “Click Here” Link: Inside the yellow section, you’ll find a hyperlinked text that says “Click Here.” Click on it to proceed with your application.
- Review Reminders and Requirements: Upon clicking, a notification box will appear. It’s essential to read and understand the reminders and requirements presented, which include:
- You can only avail of this privilege once and for only one copy of the NBI clearance.
- First-time job seekers must present a valid Barangay Certificate issued not more than a year before the NBI clearance application. This certificate should confirm residency for at least 6 months and first-time job seeker status.
2. Sign Up as a First Time Jobseeker
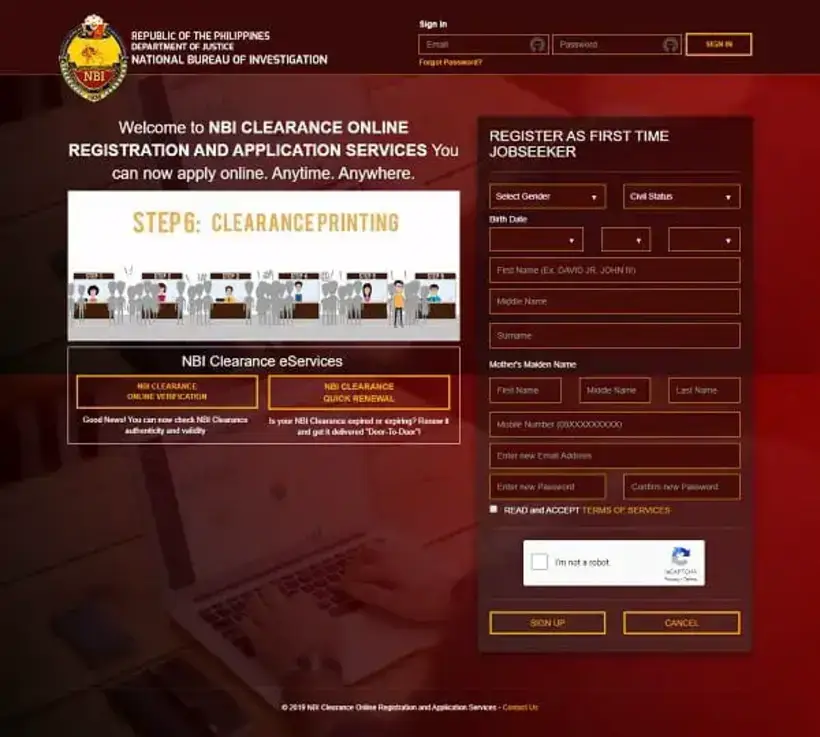
- Fill Out the Registration Form: Provide essential personal details such as gender, civil status, birthday, complete name, email address, password, and more on the registration form.
- Accept the Terms of Services: After filling in your information, carefully read and accept the Terms of Services to proceed.
- Verify with Captcha: Ensure you’re not a robot by ticking the captcha box to verify your identity.
- Click “Sign Up”: Once you’ve completed the form and verified the captcha, click “Sign Up” to initiate your registration.
- Receive and Input the OTP: Shortly after, you’ll receive a 6-digit one-time password (OTP) on your registered mobile number. Fill out the OTP field on the screen with the code you’ve received.
- Click “Submit”: To finalize the registration process, click “Submit.” You’re now one step closer to obtaining your free NBI Clearance.
3. Signing in to Finalize the ‘Applicant Information’ Form
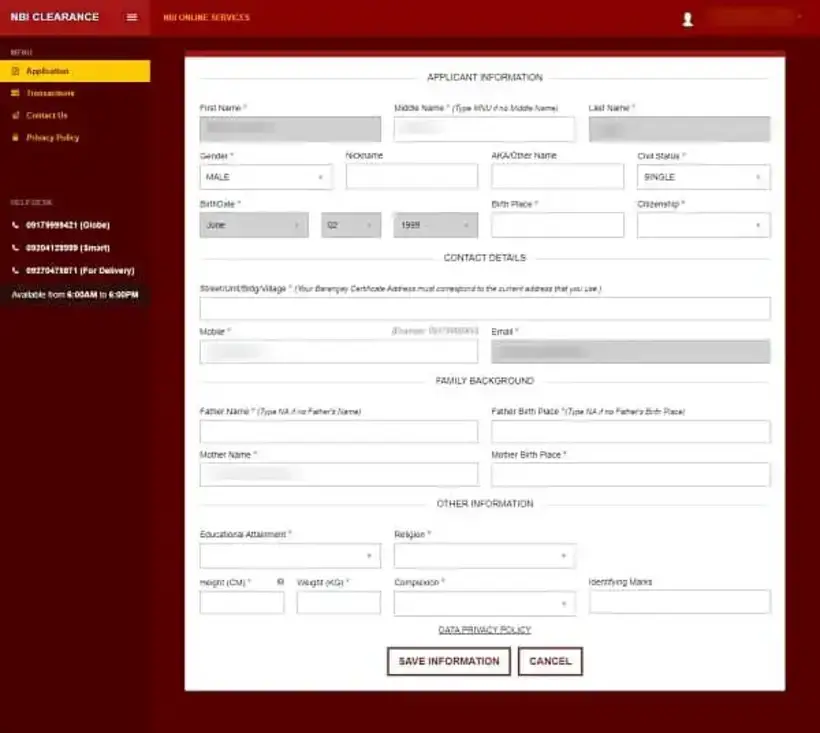
To successfully complete the ‘Applicant Information’ form and move forward with your NBI Clearance application, follow these steps:
- Sign in: Begin by signing in using the email address and password you used during the registration process.
- Access the ‘Applicant Information’ Page: After signing in, navigate to the ‘Applicant Information’ page.
- Fill in Missing Details: Provide the necessary details, including your address, height, weight, educational attainment, religion, and more, ensuring all fields are accurately completed.
- Save Information: Once you’ve filled in the form, click “Save Information” to ensure your data is securely stored.
- Review for Accuracy: Take a moment to review all the provided information for accuracy and check for any spelling mistakes.
- Submit Your Application: If everything is correct and complete, click “Submit” to proceed with your NBI Clearance application.
4. Schedule an Appointment with the NBI
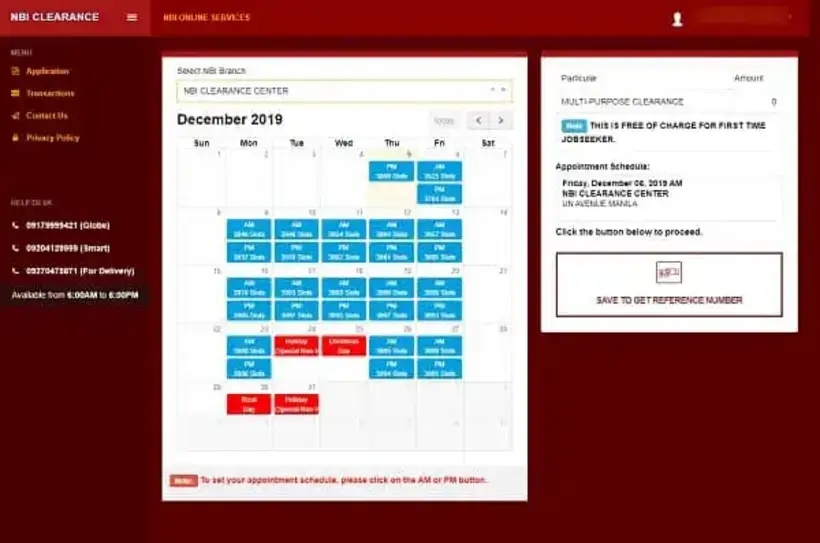
Initiating the appointment process for your NBI Clearance is straightforward with these steps:
- Access the Application Page: Begin by clicking “Apply for Clearance” located at the upper right corner of the screen (on a computer) or the top of the screen (on a mobile device).
- Provide ID Information: Enter the name and number of the valid ID you intend to bring on your appointment day (this is separate from the Barangay Certificate).
- Agree to Terms: Click “I Agree” to acknowledge and accept the terms and conditions.
- Choose NBI Clearance Center: Select your preferred NBI clearance center for processing. You can choose from various Manila and provincial branches and PHILPOST offices.
- Select Date and Time: Pick a suitable date and time for your appointment, with available slots shaded in blue and full slots marked in red.
- Save for Reference: To continue, click “Save to Get Reference Number.” This critical step ensures that your appointment is confirmed and facilitates the smooth progression of your NBI Clearance application.
5. Save the Reference Number Displayed on the Screen
- Copy or Save Your Reference Number: After successfully securing your appointment, don’t forget to copy or save the Reference Number displayed on the screen. This number is your essential gate pass on the appointment date.
- Bring Required Documents: On the day of your appointment, ensure that you have your Reference Number, along with your valid IDs and Barangay Certificate. These documents are crucial for the application process.
- Compliance with Requirements: Be mindful that security personnel at the NBI Clearance center may enforce strict entry rules for applicants with incomplete requirements. To avoid any inconvenience, double-check that you have all the necessary documents before your scheduled appointment. This diligence will help ensure a seamless experience when applying for your NBI Clearance.
How Can Foreigners Obtain an NBI Clearance in the Philippines?
In the Philippines, NBI clearance is not exclusive to Filipino citizens; it is also accessible to foreigners. This document plays a critical role in various immigration-related transactions, making it a vital requirement for those from abroad.
Foreign nationals who wish to apply for a resident visa, renew a 13a immigrant visa (especially if married to a Filipino), or pursue immigration or citizenship in another country after residing in the Philippines for at least six months will find the NBI clearance to be a key component of their application.
Much like its purpose for locals, the NBI clearance for foreigners demonstrates that the applicant is in good standing and has not committed any crimes in the Philippines.
For a detailed step-by-step guide on how to obtain NBI clearance for foreigners in the Philippines, read on.
Navigating the process of securing an NBI clearance as a foreigner in the Philippines may seem complex, but with the right guidance, it becomes a manageable endeavor. Here’s a step-by-step breakdown to assist you in acquiring this crucial document:
Step 1: Register Online
- Visit the NBI Clearance Online Services Website: The initial step to obtain your NBI clearance is to visit the NBI Clearance Online Services website. This online platform serves as the gateway to initiate your application.
- Complete the Registration Form for First-Time Applicants: If you’re applying for an NBI clearance for the first time, complete the registration form provided on the website. This form collects your essential personal details.
- Sign In for Returning Applicants: For individuals who have previously registered, simply sign in with your email and password to access your existing account.
Step 2: Secure Online Appointment
1. Fill Out Applicant Information
In this initial step, you must provide your personal details, which include information such as your birthplace and address. This data is essential for your NBI clearance application.
After filling out the required information, click “Save Information” to ensure your details are securely stored for the subsequent stages of the application.
2. Apply for Clearance
With your personal details registered, proceed by clicking the “Apply for Clearance” button. This option can be found at the top of the page for mobile users and in the upper right corner for those using desktops or laptops.
During this stage, you will be asked to select the valid identification document(s) you plan to present on your appointment day. For foreigners, acceptable IDs include your Passport or Alien Certificate of Registration (ACR) I-Card.
3. Select Appointment Details
After confirming your ID selection, a pop-up window will appear. Click “I Agree” to acknowledge the terms and conditions related to your appointment.
You’ll then be prompted to choose your appointment time and NBI branch. However, please note that foreigners located in the National Capital Region (NCR) are restricted to applying at the NBI Main Clearance Processing Center on U.N. Avenue in Ermita, Manila. Those residing outside the NCR will experience a longer waiting time, approximately 10 to 15 days, as they need to mail their application to the Manila office.
4. Payment
The next stage involves selecting your preferred payment method, which can be done either online or through over-the-counter transactions at select banks.
The current NBI clearance fee is set at Php 130, with an additional Php 25 for the e-payment service.
It is essential to retain the payment receipt, as it serves as proof of payment and may be required at various points in the application process.
5. Confirmation
Following the payment process, you should check your email for a confirmation message. Alternatively, you can return to your NBI clearance online account to verify the payment’s status.
In your online account, navigate to the “Transactions” page and click “Confirm Payment” to validate the payment made.
6. Print Application Form
Lastly, print a copy of your completed application form. This document, along with the official receipt, should be brought with you on the day of your appointment to ensure a seamless process.
Step 3: Show Up at Your Appointment
1. Visiting the NBI Clearance Main Office
- On your scheduled appointment date and time, you’ll need to head to the NBI Clearance Main Office in Manila. The office is conveniently situated on U.N. Avenue in Manila, directly across from the Manila Doctors Hospital.
- It’s essential to be punctual and arrive at the scheduled time to ensure a smooth process.
- Dress appropriately for your appointment. The NBI Clearance Center maintains a dress code that prohibits the entry of individuals wearing shorts or slippers. So, be sure to wear suitable attire.
2. Required Documents
- When you attend your appointment, you must bring the following documents:
- The original and a photocopy of your passport, including the bio page up to the visa implementation page. Alternatively, you can provide the original and a photocopy of your ACR I-Card (Alien Certificate of Registration), both front and back.
- A print-out of your completed application form.
- The official receipt that serves as proof of your payment.
- Unlike some processes that require passport-sized photos, the NBI clearance application doesn’t necessitate such photos as your image will be captured during the encoding stage of the appointment.
3. Registration and Biometrics
- Upon your arrival at the NBI Clearance Main Office, you’ll be directed to the second floor to visit the Alien Registration Office.
- Here, you’ll need to fill out Alien Registration Form No. 5, which is a mandatory step in the process.
- After completing the form, you’ll proceed to the next station, where your biometrics will be collected. This includes capturing your picture, digitized signature, and electronic fingerprints, all of which are essential for the clearance process.
4. Documentary Requirements
- Your final stop during the appointment will be at the last station, where you will present your documentary requirements.
- This step includes the provision of manual fingerprints and your signature.
- The NBI personnel at this station will stamp or write the claim date on the back of your receipt, indicating when you should return to collect your NBI clearance.
5. Waiting Period
It’s important to note that foreign applicants have a longer waiting period compared to Filipino citizens. While Filipinos can typically claim their NBI clearance on the same day as their appointment, foreigners must wait for approximately 3 to 5 days for their clearances to be issued.
This waiting period allows for the necessary verification processes to be completed, ensuring the accuracy and integrity of the clearance before it is released.
Step 4: Claim Your NBI Clearance
Visit NBI Clearance Building
Upon completing the necessary steps and requirements for your NBI clearance, your final visit is to the NBI Clearance Building. This is where you return to collect your clearance, and the process is straightforward. Your presence on the designated date is vital to ensure a smooth retrieval of your clearance.
Representative (If Applicable)
In cases where you cannot personally claim your NBI clearance, you have the option to designate a representative to do so on your behalf. This can be particularly helpful if you’re unable to be present on the specified date. To facilitate this process, your appointed representative should carry an authorization letter that includes your signatures.
Additionally, they should have a copy of your passport as proof of identity and authorization. This representative will be able to collect your NBI clearance on the designated date, making the process more convenient for you, the applicant.
How Can I Determine the Validity of My NBI Clearance?
Ensuring the authenticity of your NBI Clearance is of utmost importance, as it is a critical document for various official purposes. Here are the steps you can take to verify the validity of your NBI Clearance:
1. Utilize the NBI Clearance Online Verification Tool
To begin the verification process, you can rely on the NBI Clearance online verification tool, which is conveniently available on the official NBI Clearance website. The advantage of this tool is that it does not require downloading any additional apps or software, making it easily accessible for anyone seeking to validate their NBI clearance.
2. Access the NBI Clearance Online Services Website
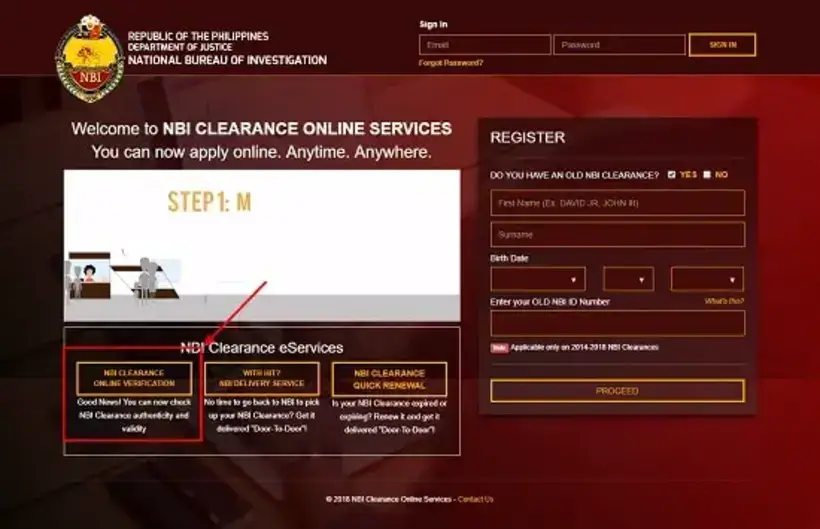
To utilize the online verification tool, visit the NBI Clearance Online Services website and scroll down to the NBI Clearance eServices section. Within this section, you will find the option for “NBI Clearance Online Verification.” Click on this option to proceed.
3. Enter Your NBI ID Number or Scan the QR Code
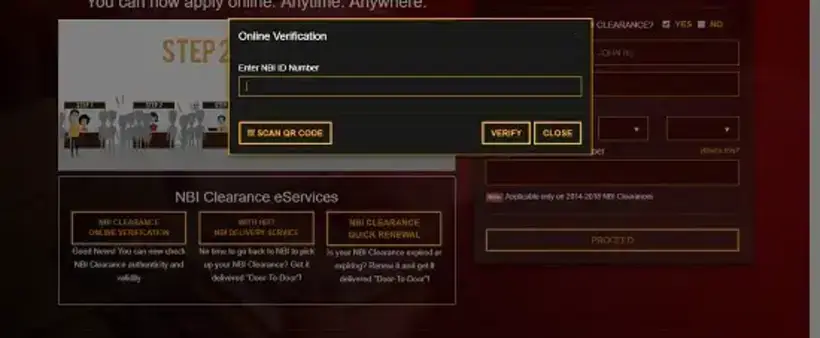
You have two options to verify your NBI Clearance’s validity. You can either manually enter your NBI ID number, which can be found on your current NBI clearance document, into the provided pop-up box. Alternatively, you can use your mobile phone’s camera to scan the QR code on your NBI clearance by clicking the “Scan QR Code” button.
4. Verification Result
Once you have entered your NBI ID number or scanned the QR code, the system will retrieve the relevant information. If the system successfully retrieves your NBI ID number, it signifies that your NBI clearance is valid and has been issued by the National Bureau of Investigation.
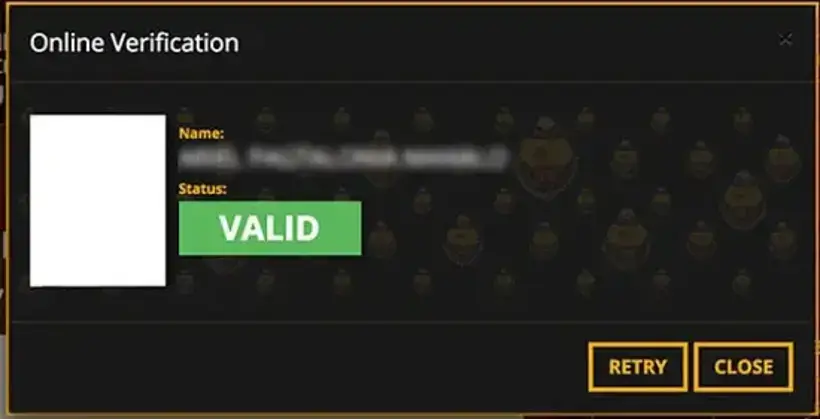
On the other hand, if the system cannot find the given NBI ID number, it is an indication that your NBI clearance may be fake or not legitimately issued. It’s crucial to follow these steps to ensure the authenticity of your NBI clearance and avoid potential complications in various official transactions.
Essential Tips and Warnings for NBI Clearance
When navigating the process of obtaining an NBI clearance, it’s crucial to be aware of various tips and warnings to ensure a smooth and successful application.
- Online Appointment is Mandatory: NBI Clearance centers strictly require applicants to have a valid online appointment. Ensure you secure an online appointment before heading to the NBI Clearance Center, as walk-ins are not accommodated.
- Personal Appearance Requirement: In the Philippines, a personal appearance is mandatory when applying for an NBI clearance. Authorized representatives cannot process your application on your behalf, as your photo and biometric information are necessary for the database.
- Always Bring Valid ID: Never arrive at the NBI Clearance Center on your appointment day without valid identification. Adhere to the “No ID, No Clearance” policy strictly enforced by NBI.
- NBI Clearance as a Supporting Document: Understand that the NBI clearance is not a valid ID for a Philippine passport application. It serves as a supporting document used for further verification by the consular officer.
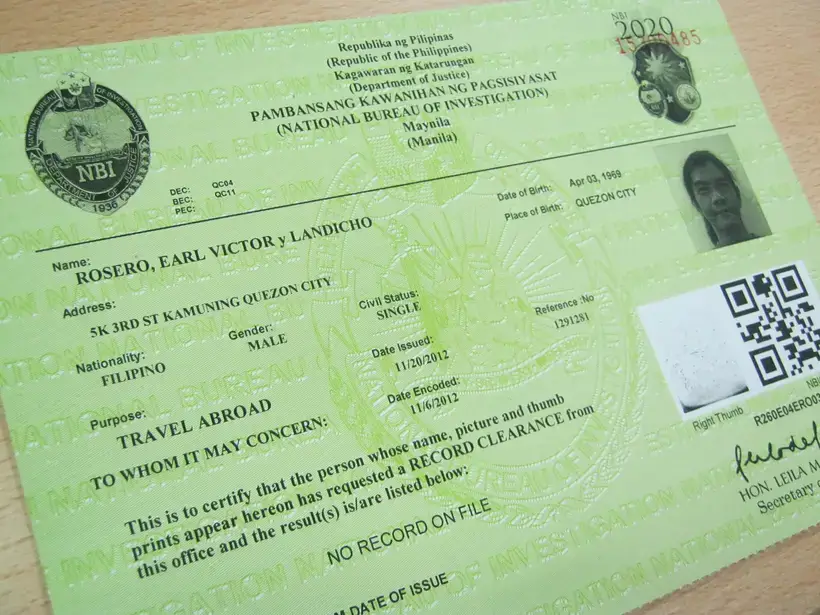
- Multi-Purpose NBI Clearance: The green NBI clearance previously used for overseas employment or travel abroad has been replaced. The multi-purpose NBI clearance issued is now suitable for all purposes, both locally and abroad.
- No Age Requirement: There is no age requirement for NBI clearance application. Both Filipinos and foreigners can apply for it regardless of their age.
- Free NBI Clearance for Fresh Graduates: First-time job applicants, particularly fresh graduates, can apply for an NBI clearance at no cost, benefiting from the Republic Act No. 11261 (First Time Job Seekers Assistance Act).
- Jaywalkers and “HIT” on NBI Clearance: Jaywalkers who fail to settle their penalties may have their names submitted to the NBI alarm list by the Metropolitan Manila Development Agency (MMDA). This serves as a preventive measure for road safety, and it’s important to be aware of the potential consequences of not addressing penalties promptly.
Common Questions and Answers About NBI Clearance
NBI Clearance is an essential document in the Philippines, serving as a proof of a person’s identity and background check for various purposes such as employment, travel, and other legal transactions.
Whether you’re a first-time applicant or need additional copies, have questions about processing times, errors in your clearance, or specific situations like having a pending case or lacking a middle name, this section provides answers to common queries to help you navigate the NBI clearance process with ease.
1. How Can I Request Additional Copies of NBI Clearance?
Obtaining extra copies of your NBI Clearance is a straightforward process. Just follow the same procedure as new applicants by visiting the official NBI clearance website and securing an appointment online. The steps are essentially the same as for first-time applicants. Be sure to bring a valid ID and the reference number from your previous clearance, as it will help expedite the process.
2. What Is the Processing Time for NBI Clearance?
The processing time for your NBI Clearance can vary, depending on several factors. The key factors include the branch you visit and your appointment time. To expedite the process, morning appointments are recommended. These appointments typically take between 15 to 30 minutes. On the other hand, afternoon appointments might lead to a next-day release, as higher applicant volumes can slow down the process.
For those applying for NBI Clearance Quick Renewal, the process takes approximately 3-5 working days for local applicants and around 20-30 days for those who are residing abroad. So, if you need your clearance quickly, planning ahead and opting for a morning appointment can be advantageous.
3. How Can I Correct Errors on My NBI Clearance?
If you spot errors on your NBI clearance, don’t worry; there’s a solution. To correct any mistakes, applicants should reapply for a new NBI clearance online. During the application process, you’ll have the opportunity to make necessary edits on the “Applicant Information” page. Double-check your information for accuracy before submitting your application.
4. Can I Obtain NBI Clearance if I Have a Pending Case?
Having a pending case doesn’t automatically disqualify you from obtaining an NBI clearance. If your case has not yet reached the Court database, you should be able to obtain your clearance without any issues.
However, if your case is in the Court system, it will reflect on your NBI clearance, resulting in a “hit” status. In this case, you’ll be required to undergo a Quality Control interview. The NBI will need to verify the details of your pending case before issuing your clearance.
5. How Does a Blotter Report Affect My NBI Clearance?
Blotter reports, which are informal records of incidents and complaints, do not typically affect your NBI clearance. Unless a blotter report has been used as evidence in a criminal case that has reached the Court, it should not be a hindrance to your clearance application. The NBI primarily focuses on formal legal cases and convictions when assessing your background.
6. What’s the Process for Applying for NBI Clearance Without a Middle Name?
For individuals who do not have a middle name, the NBI clearance application process provides a specific solution. In the designated field on the application portal, you can input “MNU” in capital letters with no spaces. This is a standard practice to indicate the lack of a middle name.
Additionally, make sure to bring your birth certificate during your appointment. The birth certificate should clearly indicate the absence of a middle name. This will be used for verification during the application process, ensuring a smooth and accurate issuance of your NBI clearance.
7. What Should You Wear for Your NBI Clearance Application?
The NBI Clearance Center does not impose a rigid dress code, but common sense prevails. It’s advisable to wear decent and proper attire when visiting the NBI office. Avoid sleeveless clothes, slippers, and short pants to make a positive impression. Your appearance matters when it comes to the photo and fingerprinting process. It’s essential to present yourself neatly and professionally, as these images will be included in your NBI clearance.
8. Is There an Apostille Alternative for NBI Clearance Instead of ‘Red Ribbon’ from DFA?
If you’ve ever needed an NBI clearance with a “red ribbon” from the Department of Foreign Affairs (DFA), there’s been a significant change. Starting from June 17, 2019, the DFA no longer issues “red ribbon” certificates. This change is due to the Philippines’ accession to the Apostille Convention, which streamlines the authentication process for documents used abroad.
Under the Apostille system, documents like NBI clearances are now affixed with an Apostille certificate, making them internationally recognized without the need for the traditional “red ribbon.” This transition has simplified the process for those who require documents for use overseas.
9. How Can You Claim an Unclaimed NBI Clearance?
If you’ve applied for an NBI clearance but, for any reason, were unable to claim it on the appointed date, there’s no need to worry. An unclaimed NBI clearance remains valid for one year from the date of issuance. To claim your clearance, follow these steps:
- Return to the NBI Clearance branch where you originally applied.
- Present the reference number, which you can find in your email confirmation or your NBI Clearance account.
- Your NBI clearance will be printed on the spot upon verification.
This system ensures that you have ample time to collect your clearance even if you missed your initial appointment.
10. What Are the Payment and Consequences for a Missed NBI Appointment?
What happens if you miss your NBI appointment? The outcome depends on whether you’ve paid the NBI clearance fee. Here’s a breakdown of the scenarios:
- If you secured an appointment but didn’t pay the fee, your slot is automatically canceled, and you’ll need to select a new date. Make sure to complete the payment process to secure your appointment.
- If you paid for your appointment and miss it, you have a grace period of 15 days from the original appointment date to appear at the chosen NBI Clearance branch with the required documents. Failure to do so nullifies your payment and application, and you’ll need to start the process over.
11. How to Handle Names with Special Characters When Applying for NBI Clearance?
Special characters, such as hyphens or dashes, can’t be used during online registration for your NBI clearance. However, if your name contains special characters, don’t worry. Here’s how to handle it:
- Enter your name without the special character during registration.
- On the appointment day, inform NBI personnel about the special character, and it will be included when your NBI clearance is printed. This ensures that your clearance accurately reflects your full name.
12. How Can You Resolve the “OTP Field is Required” Error?
If you’ve ever found yourself in a situation where the transaction you’re trying to complete is hindered by the “OTP Field is Required” error, fear not—it’s a technical issue that can be easily addressed. This error typically occurs when you are in the process of selecting your preferred mode of payment for your NBI Clearance. Here’s how you can resolve it:
- Close the Error Pop-Up: First and foremost, close the error pop-up that has appeared on your screen. Do not proceed any further with the error message.
- Log Out: Log out of your NBI Clearance account. This will temporarily remove you from the system.
- Refresh the Page: After logging out, refresh the page. This can help clear any cached data or minor issues that might have caused the error.
- Log Back In: Once the page is refreshed, log back in to your NBI Clearance account using your email and password. This will re-establish your session.
By following these steps, you should be able to proceed with your transaction without encountering the “OTP Field is Required” error.
13. Is It Possible to Reschedule Your NBI Clearance Appointment?
Rescheduling your NBI Clearance appointment is a possibility if you haven’t paid the clearance fee yet. It provides flexibility in case your initial appointment date is no longer suitable for you. Here’s how you can go about it:
- Pending Payment: If you haven’t paid the NBI clearance fee, you can reschedule your appointment by contacting the NBI or visiting their website.
- Paid Fee: Once the fee is paid, keep in mind that the appointment date cannot be changed. It’s important to ensure your availability on the selected date.
- Missed Appointment: In the unfortunate event that you miss your appointment, don’t worry. You have a 15-day grace period to process your application at the original branch. After this grace period, you may need to set up a new appointment.
14. What’s the Process for Changing Your NBI Clearance Branch?
Sometimes, circumstances may necessitate changing the designated NBI Clearance branch. The process for this change depends on the initially selected branch and requires coordination between the two branches. Here’s how to go about changing your NBI Clearance branch:
- Contact Both Branches: Get in touch with both the branch you initially selected and the branch you wish to change to. Inform them of your intent to transfer your records and application.
- Coordinate the Transfer: Work closely with the staff at both branches to ensure a smooth and efficient transfer of your records. This includes any existing application data and appointment details.
By following these steps, you can successfully switch your designated NBI Clearance branch as needed.
15. What Are the Key Differences Between NBI Clearance and Police Clearance?
Understanding the distinctions between NBI Clearance and Police Clearance is crucial, as both documents serve different purposes and have evolved with the implementation of the National Police Clearance System (NPCS) in 2018.
- Nationwide Coverage: Both clearances now have nationwide coverage due to the NPCS. This means you can use either document across the country.
- “HIT” Handling: One key difference is how they handle “HIT” results. Police clearance typically processes “HIT” results immediately for namesake verification, while NBI collects more detailed information, including civilian identification records, facial photos, fingerprints, dental records, and more.
- Information Included: NBI Clearance includes comprehensive data, making it suitable for various official purposes, while Police Clearance typically includes blotter records, criminal information, facial photos, fingerprints, and derogatory records.